Free Photography Bundle ($180 value): PS actions, LR presets, photo overlays, & print templates!
Get it here.
This article is a part of our series Photo Editing in Lightroom 101. Throughout the series we’ll cover the details of Lightroom’s library and develop modules and how you can use Lightroom to improve your own photos. As new articles are published they will be added to this page. If you don’t want to miss future articles in the series, please subscribe to our RSS feed or our email newsletter.
Today we’ll be looking at the split toning functionality in Lightroom. With the split toning settings you can add color to the highlights and shadows of your photo, and you’ll have precise control over the strength of that color. Split toning is typically used for soft and subtle effects, such as warming up or cooling down a photo. It can be used effectively with both color and black and white photos.
We’re going to start by looking at split toning a black and white photo because I think it is a little bit easier to see and understand how the split toning settings work when you are using it with a black and white photo.
Most of the time when you are adding split toning to a black and white photo you are doing it to just give a small amount of of color or tone to the photo. For our example we’ll be creating a subtle sepia effect. Here is the sample photo we’ll be working with.

To get started, find the split toning settings at the right side of the screen in the develop module. By default, everything is set to “0”.
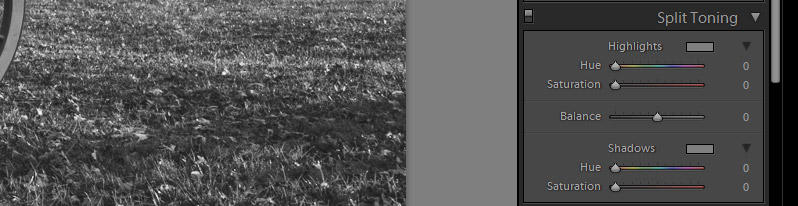
For the highlights and the shadows you have a slider for hue and a slider for saturation. Use the hue slider to select the color that you want to use, and the saturation to set the strength or intensity. If saturation is set to “0” there will be no color, so the hue slider is difficult to use. You can either slide saturation up to 100 before adjusting the hue, or hold the alt key while you are adjusting the hue slider. When you hold the alt key it will display as if the saturation is set to 100.
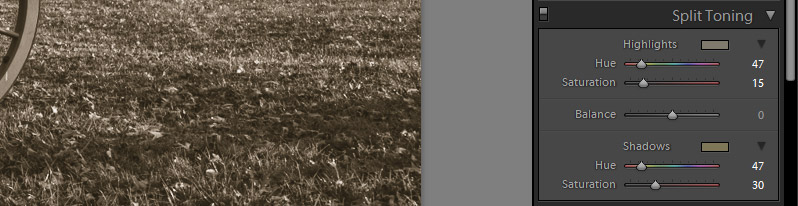
To get the sepia effect with this sample photo I am using the settings in the screenshot below.
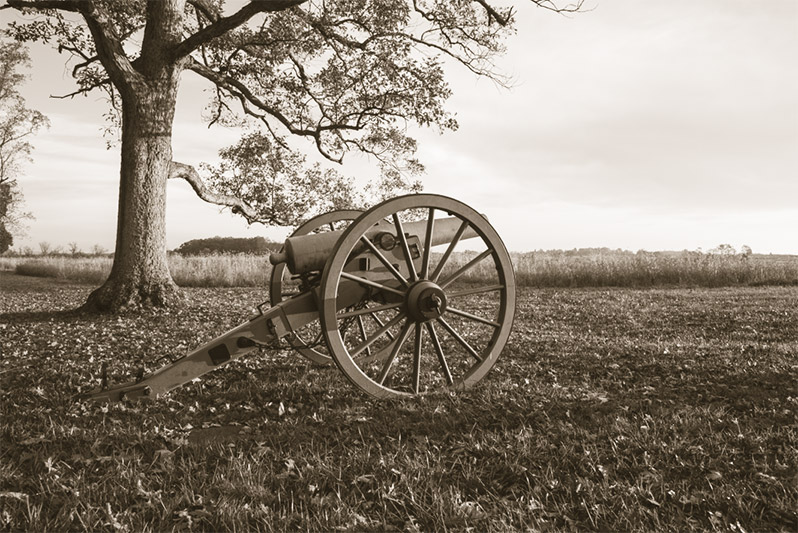
And the result is shown below.
In this example I am using the same hue for both the shadows and highlights to create the sepia effect, but you can certainly use different values here as well. If you use different values you will notice that the shadow areas have a certain tint and the highlight areas have another tint. You can also use the “balance” slider to increase the highlight color or shadow color. Move it to the left to increase the shadow color and move it to the right to increase the highlight color.
Now, let’s take a look at how we can use split toning with a color photo. If I wanted to cool the photo down a little bit I could use the settings shown below.
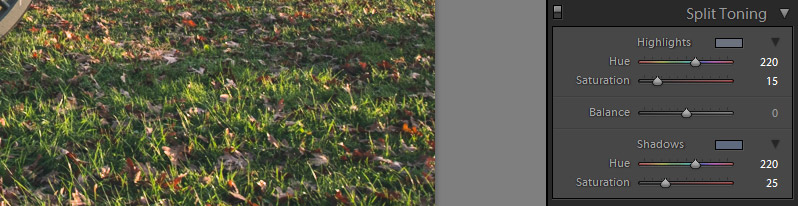
And the result is a photo that looks like this.

Again, I’m using the same value for the hue on both the highlights and the shadows, but let’s mix that up a little. If I change the hue for the shadows to “5” and leave the other settings the same, it will keep the cooling effect for the highlights and add a bit of a red tone to the shadows.
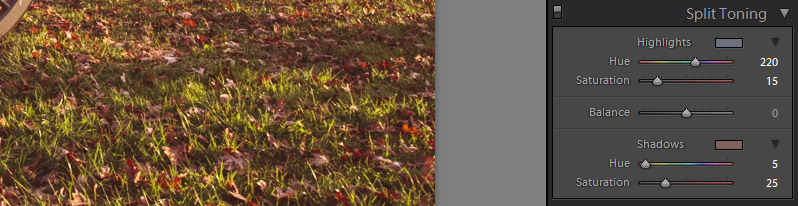
And here is the photo.

As you play around with split toning you will see that it can be quite a useful tool. Take the time to experiment and get familiar with how it works.
If you don’t want to miss the other articles in this Photo Editing in Lightroom 101 series, please subscribe to our RSS feed or our email newsletter. As new articles are published they will be added to the series page, which will serve as an index for the entire series.

