Free Photography Bundle ($180 value): PS actions, LR presets, photo overlays, & print templates!
Get it here.
This article is part of our series Photo Editing 101 by Ian Pullen. This series will cover all of the basics of using Photoshop for editing photos. If you’re just getting started with Photoshop or photo editing, or if you’re looking to improve your skills in this area, this series will provide an excellent foundation. If you want to make sure that you don’t miss future articles you can subscribe to our newsletter or follow us on Twitter, Google+, or Facebook. You can also find the articles that have already been published by visiting the Photo Editing 101 course page.
Unsharp Mask offers photographers the ability to sharpen their images with a degree of control that can be adjusted depending on the photo. While there are several one click sharpening options in Photoshop, these use automated settings that may not always be the best fit for a photo.
As convenient as they are, it takes only a few moments to open Unsharp Mask and use this tool to fine tune how sharpening is applied to your photos. Here I’m going to give you a bit of an introduction to using the Unsharp Mask tool and show how it can affect a real image. I should note at this point that the photo I’m using in this example was originally shot as a JPEG, so it will already have had a degree of sharpening applied to it automatically in camera. However, it will still be suitable for our purposes to demonstrate how Unsharp Mask works on a photo.
Should You Convert Your Image to a Smart Object?
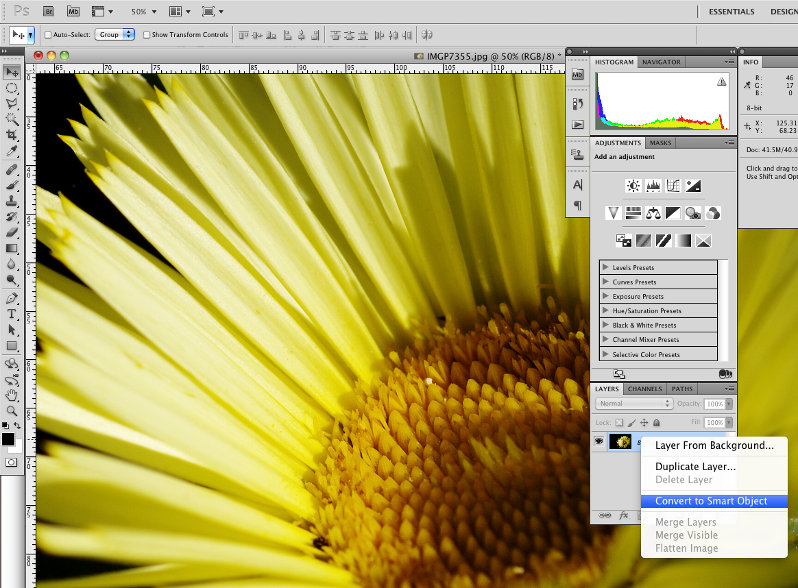
If you have a version of Photoshop that supports Smart Objects (I believe CS2 onwards), you can use this to apply non-destructive filters, such as Unsharp Mask. This means that you can adjust a filter after adding it or remove the filter effect altogether. If you apply a filter directly to a layer, once it is applied, there is no way for you to edit or delete it, so Smart Objects are obviously preferable.
To convert your photo to a Smart Object, just right click on the Background layer in the Layers palette and click the Convert to Smart Object option.
How Do You Open Unsharp Mask?

To open the Unsharp Mask window, just go to Filter > Sharpen > Unsharp Mask.
If you’re using a Smart Object, you can now click the OK button and you’ll see that Smart Filters have been added to the Layers palette and if you double click on the Unsharp Mask entry, it will reopen the dialog box.
How Do You Use Unsharp Mask?
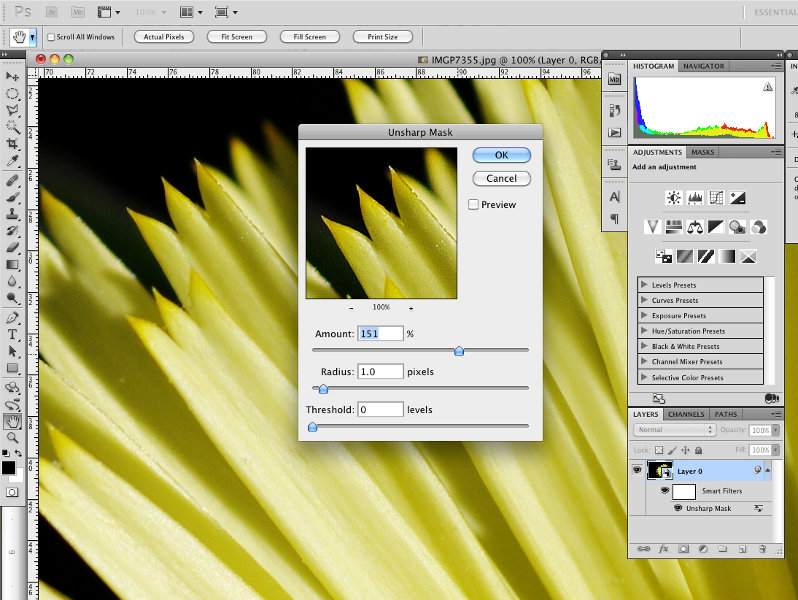
The Unsharp Mask window is quite easy to get to grips with. You’ll see there is a preview of part of the image that is zoomed 100% by default, though you can adjust this using the + and – icons under the preview. This allows you to see the effect of your adjustments as you make them and it does make sense to see the changes at 100%. However, if you tick the Preview box, you will also see the changes applied to your main file in real time.
The Amount slider is quite self-descriptive being a slider that allows you to increase or reduce the strength of your sharpening. This works by increasing the amount of contrast at the edges where different areas of the image meet.
The Radius slider adjusts how many pixels from the sharpened edges are affected by your adjustments.
Finally, the Threshold slider sets how many pixels are affected by the Unsharp Mask based on contrast. Set at zero, all of the pixels will be affected, which may appear to be a little harsh visually. As you increase this, pixels that are similar in contrast to the edge pixels will not be sharpened which can give a slightly more natural effect, but if you go too high it will counteract the sharpening effect.
How Much Should You Sharpen?
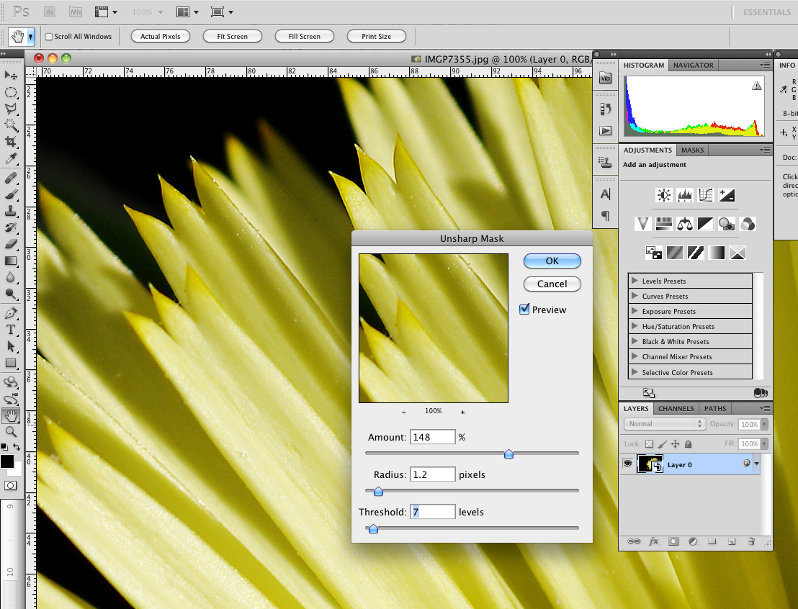
The amount of sharpening that you apply to an image will always vary depending both on the photo that you’re working on and how you intend to use it. Ultimately, you want to apply as much sharpening as you can without it becoming obvious.
If your image is to be used online, you can view the image at 100% and make your judgments based on what you see as you work on the photo.
If you’re preparing your photo to be printed, it’s not as straight forward and you will need to print your photos to confirm that you’ve judged your use of Unsharp Mask effectively. As a general guide, the Amount will probably be somewhere between 100% and 200%, the Radius between 1 and 3 with a low Threshold value, probably no greater than 20.
Conclusion
Unsharp Mask is just one of several ways that you can apply sharpening to your photos, but it gives a fair degree of control without presenting too many options for adjusting the filter.
See more articles in the Photo Editing 101 series.

