Free Photography Bundle ($180 value): PS actions, LR presets, photo overlays, & print templates!
Get it here.
Catchlights, if you have not come across them before, are the gleams of light reflected in a model’s eye in a portrait. They are captured by careful placement of lights and angling of the subject’s face, and can be shaped or controlled by the use of studio lighting tools. You can also create catchlights when shooting outdoors, using the sun or a reflective surface as the source of the light.
It’s strongly advised that you try to include catchlights in all of your portraits, whether done subtly or more deliberately placed. Here are a few reasons why you should be thinking about them every single time that you shoot.
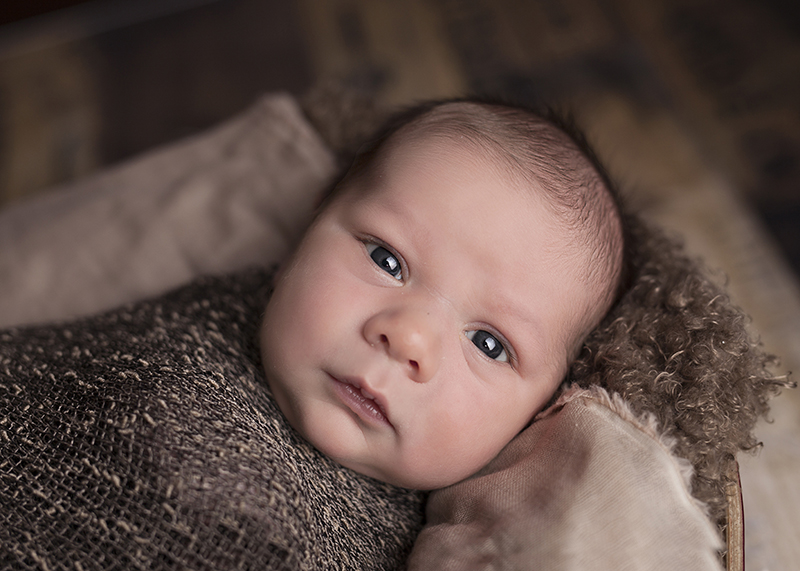
Photo by Mindy Olson
1. Create Life
The number one thing that a catchlight does is to bring life to a subject’s face. A portrait without a catchlight can appear dull and uninteresting, and may not catch the eye of the viewer. It may even seem false or unreal. A huge difference is made when the catchlight is added. The subject appears alive and vibrant, and even characterful. This is due to the depth that is added to the surface of the eye with the introduction of the light.
The placement of the catchlight and how it is captured can really bring a different effect to the subject’s face. It can make them appear soulful or sad. It can bring joy and excitement to their expression. It can even make them look cheeky or mischievous. This glint in the eye, in other words, makes them into a real person – and that is something that viewers can really connect with when they look at your work.
If a model has very dark eyes, or you are planning to put the image into black and white, this is even more important. A dark eye will appear to fade away from view and can seem unfocused or distant. Bringing that little bit of light in will give the image a whole new reading, and can even save a situation in which the rest of the lighting went awry.
2. Draw the Gaze
The gleam of light can often be the brightest area of the photograph, and this does something very important: it draws the eye. When you have a model that is looking out at the viewer with a catchlight in their eyes, the viewer cannot help but stare back. This will, in turn, encourage them to take in the rest of the image, which is a very good way to get your work considered more fully.
It’s also a great trick for advertising. Marketers know that most viewers will follow the gaze of a subject in a photograph. In other words, if you have a model looking to the left, you will follow their gaze and end up looking at the product that is being advertised. Add in the catchlight to grab the attention right away, and you have a double whammy which will make the advert all the more effective. If you are interested in shooting commercial, advertorial, or stock photography, then you absolutely have to keep this in mind.
3. Make a Connection
When the viewer and the model lock eyes, it creates a connection which can draw the viewer in more and help them to understand more about the subject. Again, you can achieve this by the use of the catchlight, which makes the model both more real and more noticeable. This is a really great thing to keep in mind if you are a portrait photographer, trying to put together emotive work for a personal or professional project, or simply trying to get your work seen. The deeper connection a person feels when viewing your work, the better: they are then more likely to remember it and to refer back to it if they wish to have their own portrait taken or purchase one of your prints.
4. Create an Effect
You can also create some interesting effects with the use of catchlights. It all depends on how you set up your studio lighting – for example, using a circular ring of lights around your lens can create the same pattern in the eye of your model. That is something that really looks special!
Think about the shapes that you could create and use. With a bit of old, thin, white fabric and a frame made from cardboard, you can come up with a temporary diffuser which creates the light shape you want. How about using letters? Or numbers? You could try symbols and signs, or just a general shape – square, circle, triangle, star. It’s all down to your own creativity as well as what is going to fit the final image best. If you already have a large softbox, you can even use gaffer tape to create a shape on the fabric there which will reflect in the eye. This can lead to a much more exciting finished product, especially if your image is a close-up portrait. Put it into black and white, and that catchlight will shine out all the more strongly.
5. Control Your Light
Be sure to control your catchlights if you are going to use them. You might want to take out some catchlights that are not as flattering – for example, holding a reflector under a model’s face can lead to a large square shape at the bottom of the eye. If you have too many shapes in the eye, they can become distracting, causing viewers to think about your lighting rather than the portrait as a whole.
Use bot on-set control and post-production to control your catchlights. This can be done with a bit of thought and some planning. You can actually use a marble as a trick to find out how your catchlights will look. Hold it up in the light and have a look at what it reflects back. If you see something that looks out of place, then move the light source – or plan to take it out in post.

