Free Photography Bundle ($180 value): PS actions, LR presets, photo overlays, & print templates!
Get it here.

Waimea, Hawaii by Tiffany Mueller
Good landscapes are more than just beautiful scenery, the photograph has to be interesting. Once you find a photo-worthy view, it’s your responsibility as a photographer to capture it in a way that takes it from being just beautiful to being beautiful and captivating.
To accomplish this, there’s a number of factors to be taken into consideration. Some of them are technical aspects, while others are more theory, but here are a few tips you can use to improve your landscapes.
If you love landscape photography please be sure to check out our sister site Loaded Landscapes.
1. Choose The Right Lens
When most people think of landscapes, they think of big wide angle lenses. While a wide lens is an important piece of equipment in the landscape photographer’s gear bag, you shouldn’t limit yourself to one type of lens, when possible. Long lenses will give you a more compressed feel and objects will appear to be bigger and closer together. If you’re trying to highlight a certain objects inside of your landscape, a longer lens may be the better choice. If you can only afford one lens, make it a versatile zoom lens that will allow you to capture wider angles, but still give the opportunity to zoom in as well. Then start adding prime lenses as your budget allows.

Mauna Kea by Tiffany Mueller
2. Pay Attention to the Horizon
The horizon is a very important part of a landscape image and it should be given a good amount of attention when setting up your shot. For starters, you’ll want to make sure it’s level. Many DSLR’s and tripods have levels built into them specifically for situations such as these. Just make sure it’s the last thing you check every time you take a photo and before long it will become habit.
There’s also a lot to be said for the impact a poorly placed horizon can have on a photo. There are certainly going to be times when the rule of thirds may not be the best way to compose a shot, but when you’re in doubt or having trouble finding a sweet spot, remember, the horizon line almost always looks good when the sky takes up the top third of the photo with the horizon taking up the bottom two thirds or vice versa. To practice framing the horizon line, take several of the same shots with the only difference being the placement of the horizon. Take one photo with the horizon at the top third, one in the middle, and one with it at the bottom third of the image to see which one looks best and why.
3. Find the Right Lighting
Always examine the direction of the light, the quality of the light, and how it’s affecting the landscape. As with any photograph, a great landscape takes great lighting; however, landscape photographers are much more at the mercy of mother nature. We have to find the perfect combination of patience and predictions as to when the sun’s light is going to look it’s best. Most typically, this occurs during golden and blue hours, when the sun’s position in relation to earth’s diffuses the sunlight and creates much more colorful tones. There’s even apps that tell you precisely when golden hour is to help plan for photo shoots.
Adventurous photographers will also find the sky to be more dramatic than usual right before and after a big storm rolls through. Next time you hear thunder rolling through the sky, look for interesting cloud patterns and colors in the sky.
![The Bridge [Explored]](https://farm8.staticflickr.com/7318/9518366702_c6ee47f516_z.jpg)
The Bridge by Frank Schulenburg
4. Create Dimension And Scale
When you’re thinking about the best way to go about composing a frame, a great way to add interest to the scene is to try to give the image dimension. Utilizing leading lines is a great way to do this, as you will not only be creating a some depth and dimension to your image, but you’ll also be giving the viewers eye a strong point of interest.
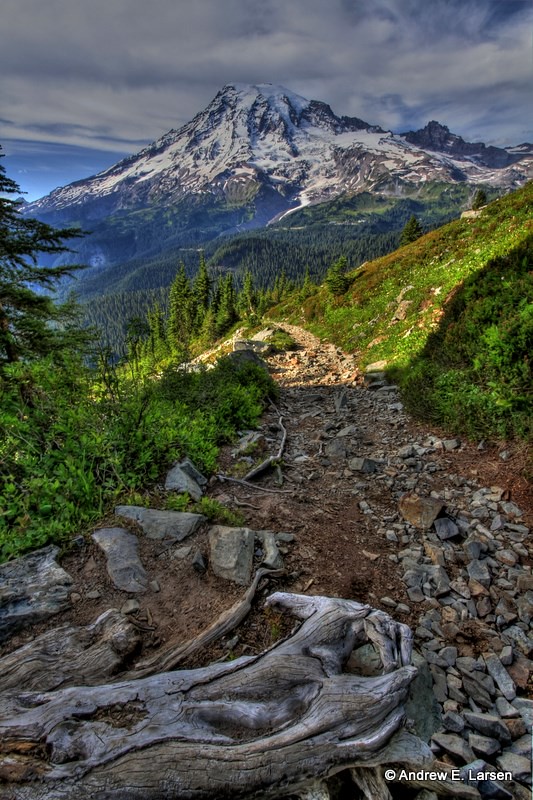
Giver of Life by Andrew E. Larsen
However, since leading lines aren’t always possible, try breaking your composition down into three parts: the foreground, the middle, and background. Study your compositions, do they have a clear front, middle, and back or are they falling a little flat? Try giving your viewers a point of focus in the foreground, without neglecting the focus of the other two sections. The photo above is a perfect example. The viewer’s eye is drawn to the rocks and log in sharp focus in the foreground, then their eyes are led down the trail to the sunny midsection, before landing on the gorgeous mountain in the background.
Practice Makes Perfect
The best way to capture better landscapes is to practice as often as possible. When you’re out there shooting, experiment as much as possible. Photograph all the safe compositions, but step outside of the box and try new things, too. When you’re reviewing your images, ask yourself what you like and don’t like about them and take notes so you’ll know what to do and what not to do next time you’re shooting. Things will become much more instinctive the more you are able to practice and you’ll be able to produce stunning results more often.

