Free Photography Bundle ($180 value): PS actions, LR presets, photo overlays, & print templates!
Get it here.
If you are looking to improve your photography skills you are in luck! Here you’ll find 30 different suggestions that you can put into practice to see significant improvements in your own photography over the next 30 days.
1. Read Your Camera’s Manual
When it comes to improving your photography it’s important that you understand your camera and what you can do with it. While it may not be the most exciting reading, taking the time to go through the manual can help if you have not already mastered your camera.
Learn how to use the various features of the camera because without that knowledge you won’t be able to put those features and functionalities to work for you. It’s not important that you read the manual word-for-word, but at least scan through it and look for things that you don’t already know. When you find something new, slow down so you can comprehend it, and actually try it on your camera.
2. Practice Every Day
Whenever you want to improve at something, regardless of what it is, it’s important that you practice. Get in the habit of taking your camera with you everywhere and make an effort to practice your photography in some way every day.
3. Improve Your Skills in Lightroom and/or Photoshop
Post processing is an important part of digital photography. You don’t need to learn how to do advanced photo manipulation and all kinds of crazy things in Photoshop, but it is important that you learn your way around Photoshop or Lightroom and how to effectively process and edit your photos.
While Photoshop is extremely powerful, Lightroom is my personal preference. Lightroom is an excellent tool for both organizing and processing photos, and that is what makes it really stand out. Both Photoshop and Lightroom can be a little overwhelming at first, but once you get some experience you’ll find the quality of your photos can improve significantly.
If you’d like to learn more we have a free series of tutorials for each: Photo Editing in Photoshop 101 and Photo Editing in Lightroom 101.
4. Make Use of Available Resources
Post processing can require a serious amount of time if you take a lot of photos, and improving your workflow can help you to reduce the amount of time it takes, leaving you more time for other things. One way to improve your workflow is to make use of available resources like Lightroom presets and Photoshop actions. It could be presets and actions that you created yourself for your own use, or some that you have purchased. Creating your own is a great option, although most photographers choose not to dedicate the time required to do so.
Using a set of workflow presets like our Master Workflow Lightroom Presets is an excellent way to improve your efficiency and get great results. Master Workflow includes more than 60 one-click presets for quick edits, as well as more than 250 stackable presets that give you a great deal of flexibility to create your own style.
5. Follow Tutorials
If you want to learn more about any particular aspect of photography, chances are there is a free tutorial online that will teach you. Following along with tutorials is a great way to quickly pick up tips and learn new techniques. If you’re not sure where to find a tutorial you can, of course, do a Google search. We also have a collection that is a great place to start: 101 Photography Tutorials to Elevate Your Skills.
6. Read a Book
Online tutorials are one option for learning, and another great option is to read a book, or even an e-book. There are countless books and e-books available on just about any photography-related subject you can image. Visit your local library and save some money, or check out the selection at Amazon.
7. Shoot in RAW
While there are some benefits to shooting JPGs, in general RAW files will allow you to create the best photos possible. With RAW files you’ll have more options and better potential in post processing, and RAW files will be a little more forgiving of small errors in exposure. If you want a more detailed look at why you should shoot RAW, please read this: 11 Reasons to Shoot in RAW Format.
8. Shoot at the Right Times
If you are taking photographs outdoors, such as landscapes, travel photos, and outdoor portraits, the time of day can have a big impact on your results. Lighting is a critical element for every photograph, and lighting changes drastically throughout the day and in different weather.
If you’re looking to get the best results, make an effort to shoot at the times of the day that typically offer the best light. Getting out around sunrise and sunset will generally give you the best lighting conditions. The window of time after sunrise and before sunset is, of course, known as the golden hour and is a favorite of many photographers. If you’re shooting landscapes don’t forget about the blue hour (before sunrise and after sunset).
9. Understand the Exposure Triangle
It’s possible to improve your photography by focusing on things like composition and post processing, but if you really want to get the best results it is critical that you understand the exposure triangle. Understanding how aperture, shutter speed, and ISO interact is essential to master the craft. With a solid understanding of exposure you’ll be able to take control.
If you want to learn more please see Understanding the Exposure Triangle by Chris Poindexter.
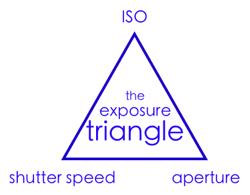
Exposure Triangle by Michael Hernandez
10. Master Manual Mode
While you are working to master the exposure triangle, and once you have done so, learning to shoot in manual mode is the next logical step. While aperture priority and shutter priority certainly give you much more control than auto, manual mode will give you full creative control and allow you to expand the possibilities. Modern cameras are pretty smart, but auto mode will always have limitations. If you’re comfortable taking full control you will be well on your way to better photos.
To learn more please see How to Shoot in Manual Mode – The Basics by Courtney Slazinik.
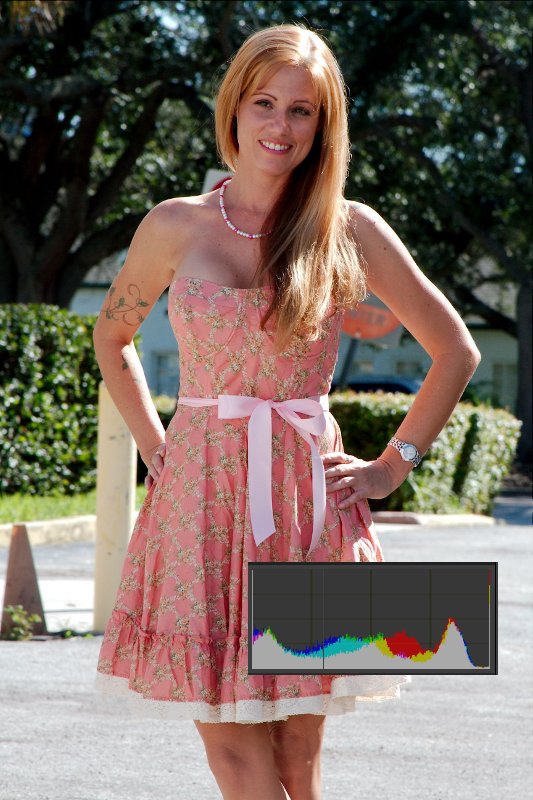
11. Master the Histogram
When it comes to getting the proper exposure, your camera’s histogram can be an extremely valuable tool. If you’re not familiar with the histogram it can seem a little overwhelming, but it is something that you can learn pretty quickly. The histogram is a graphic display of the tonal range in a photo, and it’s an incredible tool for helping you to properly expose photos.
To learn more details about the histogram please see Using Your Camera’s Histogram Display to Take Better Pictures.
12. Use a Tripod
A tripod can help to improve your photography in a few different ways. First, and most obvious, a tripod can help you to get sharper photos by eliminating camera movement. This can be especially important with telephoto lenses or in situations where slow shutter speeds are required.
Tripods can also help by opening up more creative opportunities. For example, if you are photographing a waterfall you may be able to get the shot handheld, but a tripod will also give you the option to use a long exposure that will blur the movement of the water. Using a tripod can also help to improve your composition because it forces you to really concentrate on how you compose each shot. If you don’t currently use a tripod start carrying one with you and use it whenever possible.
13. Get Out of Your Comfort Zone
Many of us fall into certain habits in our photography. It could be using the same lens, shooting the same types of subjects, following the same rules of composition, or going to the same places. More importantly, your habits and your comfort zone can also prevent you from trying new things.
Take some time to think about your own habits and how they might be holding you back. Make an effort to intentionally break your own habits and get outside of your comfort zone. This is when you will typically learn the most.
14. Limit Yourself
In some situations you may also find that putting arbitrary limitations on yourself can help you improve. This can be used in combination with stretching your comfort zone, but it doesn’t have to. Some examples of limitations would be to uses only one specific lens for a day or a week, shooting only in one specific mode, focusing only on one type of subject, or whatever else you think will allow you to improve in a specific area. Imposing a limitation on yourself is great for controlling your learning. Rather than simply working to improve your photography in general you will be working to improve in one particular aspect or in one specific way.
15. Focus on Something Specific
Along the same lines as the previous point, you can place an emphasis on one specific type of photography. If you place all of your current effort into improving in one discipline you will likely experience quicker growth. Some possibilities would be to focus on portraits, macro photography, black & whites, still life, landscapes, wildlife, etc.
16. Learn Composition Rules, and Break Them
When it comes to composition there are a lot of rules or guides that you can follow (the rule of thirds is often the first that comes to mind) to help improve. However, they are really just suggestions and tools that you can use, not something that you need to follow with every shot. Breaking the common rules of composition can often result in interesting photos, so be willing to take some chances.
To learn more about composition please see 18 Composition Rules for Photos That Shine.
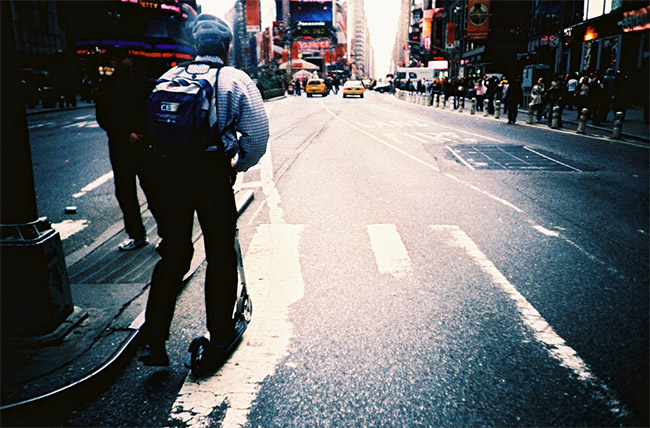
On a Scooter in NYC by Rodrigo Cayo
17. Emphasize Perspective
If you want to create interesting and unique photographs emphasize perspective. Most photos are taken from typical perspectives, so finding more creative perspectives will usually result in photos that get noticed. For example, instead of always shooting a portrait from eye level, get high or low. Instead of shooting a common landmark from the typical location or angle, find a way to get off the beaten path and get a unique perspective.
For some inspiration please see 20 Amazing Examples of Perspective in Photography.

Photo by Victory Kurbanova
18. Use Leading Lines
Leading lines can be an awesome tool for creating interesting compositions. Lines are all around us, and if you can put them to use in your composition it will result in photos that get noticed. It could be a line of trees, a road, a row of buildings, a row of people, or any other line or row.
For some examples please see 23 Photos That Use Leading Lines.

Netherlands American Cemetery and Memorial by Rob Hogeslag
19. Learn to Frame Your Photos Effectively
How you frame or crop your photos can have a big impact on composition and the overall look of the photo. Sometimes you may want to take a creative approach to framing that will cut off part of an element of the photo, which can add intrigue. Learning to use framing and cropping effectively will help to improve your results.
20. Find Patterns
Making use of patterns can be another way to make photos more interesting. Like leading lines, patterns are all around us. You’ll just need to look for them and find creative ways to showcase them in your photos.
For inspiration please see 20 Beautiful Examples of Patterns in Photography.
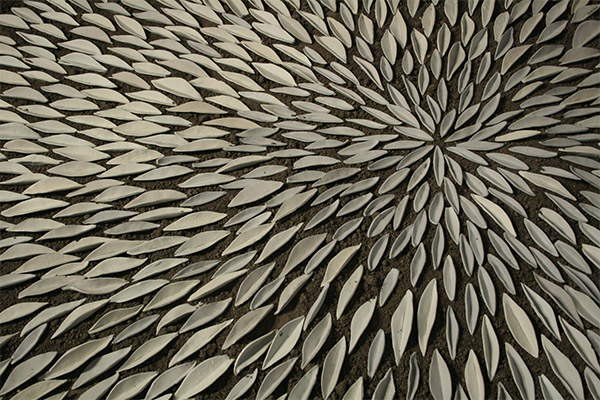
Untitled by Chucho Solace
21. Experiment with Shutter Speed
Varying your shutter speed will allow you to do some creative things. A faster shutter speed will help to freeze objections in motion, and slowing down the shutter speed will cause moving objects to blur, or cause everything to blur if your camera is in motion during the shot. Generally you will want to use a shutter speed that is fast enough to capture sharp details, but playing with blur can be a great way to get a creative shot.
22. Find Interesting Subjects Around You
When it comes to taking better photos the temptation is to think that you need to visit some amazing location or have a stunning model. In reality, opportunities are all around us. Finding interesting subjects around you could involve look for opportunities in your house or your yard, looking for locations in your town or city to photograph, or simply going on a photo walk in an urban area.
Possibilities in your house and in your yard include still life shots of flowers, jewelry, toys, food, or any other object. It could also involve macro shots in the back yard, or photographing birds or other wildlife that may be there. It’s also possible to find local destinations in your area that you may not even be aware of. Do a Google search for best photography locations is your city, town, or county and you’ll likely find several blogs posts and forum threads where other people have listed their favorite locations. With some creativity you won’t need to travel in order to get amazing photos.
23. Re-visit an Old Location
You may be overlooking some good opportunities if you are not considering locations that you have already photographed in the past. As you improve your skills you will naturally get better results, so going back and hitting the same locations again can still be a worthwhile activity.
Also, if you are shooting outdoors most locations will change drastically at different times of the year and different times of the day. If you re-visit an old location at a different time of day or year you’re likely to get photos that will be significantly different.
24. Find a Local Photography Club
Getting together with other photographers in your local area is a great way to have fun while improving your skills. Many photography groups hold organized photo walks or events at specific locations. Getting involved will help you to work on your own skills and you may even benefit from some of the relationships and connections that you make through the group. Meetup.com is an ideal place to search for a group in your area, but you may also be able to find others through a Google search.
25. Be More Selective
While you do want to be practicing is often as possible, it’s also helpful to be more selective in the photos that you take. Rather than taking a spray-and-pray approach and constantly firing off shots, slow down and think about the photos that you are taking. When you slow down and only take photos that matter you will be able to focus more on each shot, and you’ll have far fewer photos to deal with in post processing.
26. Get Close
Make an effort to get closer to your subject and fill the frame. This can apply to just about any type of subject from portraits to nature to still life. Filling the frame will often result in more interesting and more powerful photos.
27. Get Feedback
An important part of improving is to get feedback from others. Being able to accept and learn from constructive criticism is a great way to improve your skills. Fortunately, there are a number of websites, blogs, and forum threads where you can get feedback for your photos. See 6 Websites to Get Photo Critiques.
28. Be Inspired
Viewing the work of talented photographers is ideal for seeing what works and getting ideas that can be put to use in your own photography. Fortunately, finding photography inspiration is very easy online. All you need to do is go to a site like 500px, Behance, 1X, Flickr, or Pinterest and you are sure to find plenty of amazing photos. You could follow the work of specific photographers, follow Pinterest boards for inspiration, or look for awesome photos of a particular location. One of my habits when researching a location is to search sites like Flickr and 500px. I can usually find some beautiful photos that show me the best places to go, best subjects to photograph, or give me examples that I can try to emulate.
Follow PhotographyPla.net’s board Photography Inspiration on Pinterest.
29. Find a Model
If you’re interested in improving your portraits you should work to find someone who is willing to model for you. Ideally it will be a friend or family member, but sites like Model Mayhem also allow photographers and models to match up.
30. Make Your Own Backdrop
Another possibility is to create your own backdrop or makeshift home studio. You don’t need to spend a lot of money to create a great setup. See 55 Awesome DIY Photography Backdrops for plenty of ideas.
This most important thing is to take action. Make an effort to practice every day and you’re sure to see improvement.

