Free Photography Bundle ($180 value): PS actions, LR presets, photo overlays, & print templates!
Get it here.
This article is part of our series Photo Editing 101 by Ian Pullen. This series will cover all of the basics of using Photoshop for editing photos. If you’re just getting started with Photoshop or photo editing, or if you’re looking to improve your skills in this area, this series will provide an excellent foundation. If you want to make sure that you don’t miss future articles you can subscribe to our newsletter or follow us on Twitter, Google+, or Facebook. You can also find the articles that have already been published by visiting the Photo Editing 101 course page.
The Exposure Adjustment Layer in Photoshop is just one of several ways to make adjustments to the exposure of your photos. Other tools, such as Curves and Levels work in different ways and you can even use duplicated layers combined with blending modes to adjust overall exposure. Which option you choose will really be a matter of personal choice and also what seems best for a particular photo.
In the next few steps, I’ll introduce you to the Exposure Adjustment Layer and show you how the features available can be used to adjust your photos.
How Do You Add an Exposure Adjustment Layer?
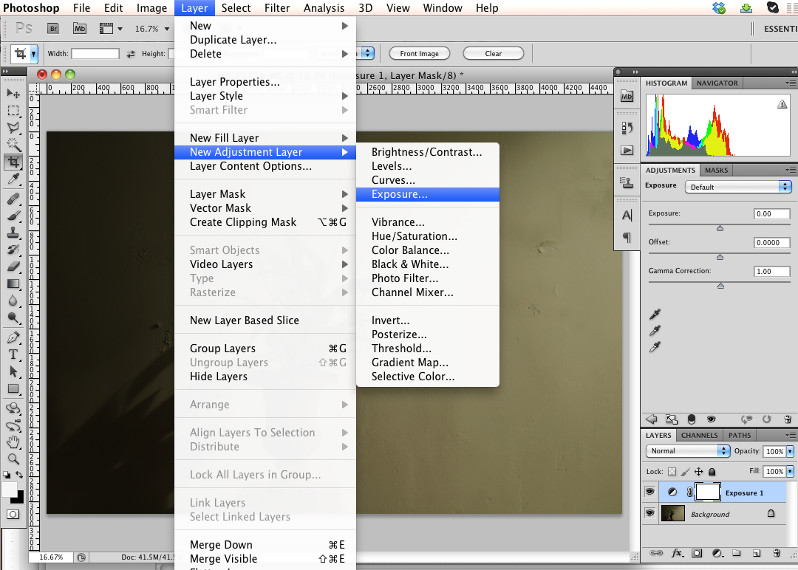
If the Adjustments panel is already open, then you just need to click the Exposure icon which is on the right hand side of the first row of icons, represented by a plus and minus symbol in a diagonally split rectangle. Alternatively, go to Layer > New Adjustment Layer > Exposure. In both cases, you’ll see a new layer added to the layers palette.
How Do You Use the Presets?
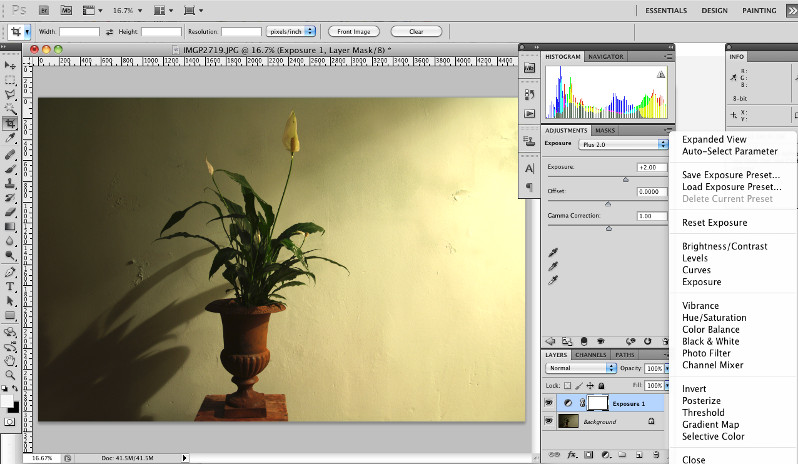
As with many adjustment layers, the first control is a drop down menu that contains presets that you can select from to make quick adjustments. With Exposure the options are quite simple, but you can always save your own settings by clicking on the small icon at the top right of the Adjustments panel and then clicking on Save Exposure Preset.
What Does the Exposure Slider Do?
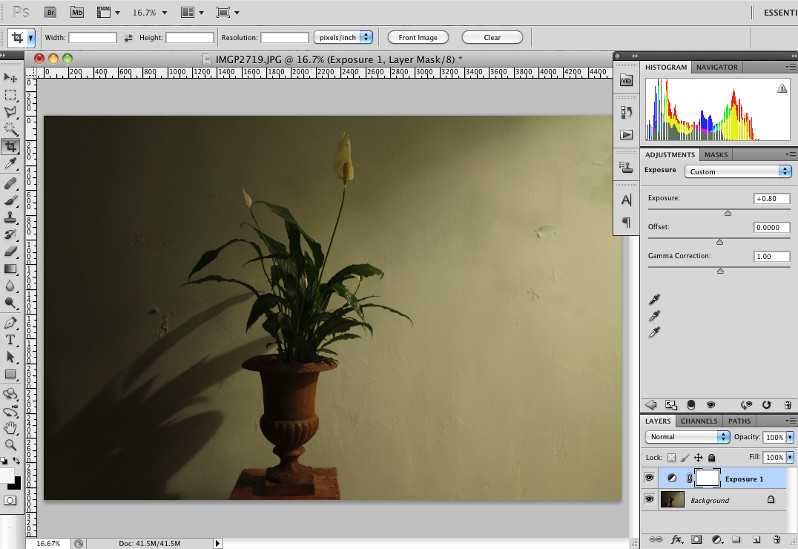
The Exposure slider is probably the least mystically named of the control sliders and unsurprisingly it allows you to adjust the exposure of your photo. Dragging to the right will lighten an image, while dragging to the left darkens it. As you do so, you’ll see the EV steps value change and you can also choose to type a value directly into this box.
You should notice that any adjustments that you make with this slider have a greater effect on the lighter tones of an image, than the darks. While each of the three sliders do affect the overall tones of an image, each one has a greater influence over specific tonal ranges.
What Does the Offset Slider Do?

The Offset slider isn’t obviously named, but this control has greatest influence over the dark tones of photos. Sliding it to the right will lighten shadow areas, but you should take care as you’ll quickly see that images can start to look washed out as this is adjusted in this direction. Sliding to the left will darken your shadow areas and if you overdo this, you will start to see some unnatural color shifts occurring.
Because this control can be particularly sensitive, it’s worth noting that sliders in Photoshop work in two ways. You can click directly on the adjuster and drag it. However, you can make more fine grained adjustment by hovering your cursor a little above the slider. You should now see the cursor change to a pointing hand with a left and right facing arrow. When this cursor is visible, you can click and drag and you will see that you can now make much finer adjustments than dragging the slider directly.
What Does the Gamma Slider Do?

The Gamma slider has greatest effect over the mid tone range of your images, though the direction that you adjust the slider is counter intuitive. To darken the image, you need to slide it to the right and vice-versa to lighten it.
What Do the Eye Droppers Do?

As with many other adjustment layers, you can also make once click Exposure adjustments by using the eye dropper controls and clicking directly on the image to select values.
If you use these eye droppers, you’ll see that the white and gray droppers each adjust only the Exposure slider value, while the black dropper adjusts just the Offset slider.
Conclusion
Exposure Adjustment Layers are specifically designed for making exposure corrections to your photos and they are worth taking a look at to see if they may offer you a better option than some of the more traditional ways to edit your photos.
See more articles in the Photo Editing 101 series.

