Free Photography Bundle ($180 value): PS actions, LR presets, photo overlays, & print templates!
Get it here.
Many photographers, amateurs and professionals alike, love to capture the beauty of nature through landscape photography. We’ve all seen amazing landscapes in magazines, books, prints, and online galleries, but sometimes it may seen that your own landscape photos fall short of your expectations. If that is the case, here are 15 tips that can help.
If you love landscape photography please be sure to check out our sister site Loaded Landscapes.
1. Research the Location
One of the things that I’ve found to make a huge difference for me is researching a location ahead of time. If I’ll be traveling to a location that I’m not very familiar with I’ll usually do a Google search for “best photography locations in ____”, or something similar. These types of searches tend to lead you to forum threads that can be extremely helpful. In one forum thread you may be able to read the advice of several different photographers and travelers with feedback about their favorite spots. This is a great way to find “hidden” spots that may not be known to most tourists or visitors.
Another way I tend to research is to search sites like Flickr and 500px for the destination. A lot of photographers tend to label their photos rather specifically at these sites, so you may be able to get some detail about the location of the shot by the title, description, or tags. For example, before a recent trip to Great Smoky Mountains National Park I did a search for sunrise locations and found a few photos that listed which overlook they were taken from, and that helped me to map out where I wanted to head before sunrise for the best views.
If you’ll be staying over night you may also want to use this research to help you decide where you want to stay. If you’re planning to be up for sunrise or out late it can help to have a room close to specific spots that you want to hit.
2. Pay Attention to the Weather
Weather is a huge factor for photographing landscapes, so be sure to take it into consideration. If you’re looking for dramatic photos bad weather isn’t always bad. Inclement weather can often make for interesting photos, and the time after a storm can provide an opportunity for an amazing sky in your shots. If the weather is bad, watch for an end to the storm and, if possible, get yourself in an ideal spot for that time when the weather clears.
A coming storm helped to provide a dramatic sky for the photo below.
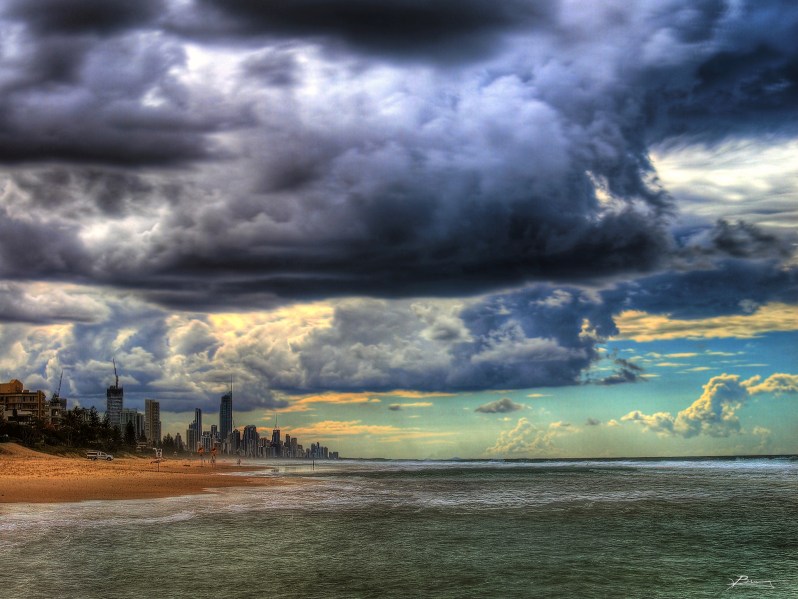
Photo by Paul Bica
Apps for your tablet or smartphone can help you to stay on top of the weather. Some of the best options include Magical Weather, The Photographer’s Ephemeris, RadarScope, and Fahrenheit.
3. Be Out at the Right Time of Day
It’s no secret that the hours around sunrise and sunset are usually preferred for landscape photography. Personally, I usually prefer sunrise over sunset in part because there are typically fewer people out at sunrise. This means that you’ll be more likely to get shots without people in the frame and you’ll have more privacy and generally feel less rushed. Depending on the time of the year and the location, it’s likely that you’ll have a few hours after sunrise before activity really picks up for the day.
When it comes to sunset, most people watch the sun drop below the horizon and pack up. Many times the hour after sunset will produce beautiful skies and amazing photo opportunities, so stick around to be rewarded.
4. Be Patient
Because factors like weather, lighting, and the time of day are so critical, patience is often needed. You may need to wait for the sun to get to the right height, for the sun to poke out from behind the clouds, or for weather to clear. Being in the right spot is important, but being there at the right time is equally important.
I’ve also found that for me having patience also means not taking tons of shots while I’m waiting for the right moment. Constantly firing away leads to more photos to sort through and compare, and more time for post processing. I’ve found that instead of having loads of similar photos, shooting fewer and having a smaller number to work with makes my work in Lightroom much more manageable.
5. Take Food and Water
Landscape photography often requires that you’ll be out for hours at a time. Whether you’re hiking a trail or just driving to your locations it is helpful if you have some food and water with you. It can be frustrating to have to head home because you need something to eat or drink. In some locations there may not be anywhere close by where you can easily buy food or drink, so be prepared and take something with you so you’ll have the option to stay out longer.
6. Shoot in RAW
Shooting in RAW files instead of JPGs will allow you more flexibility when it comes to post processing. Working with shadows and highlights is one area where RAW files are superior for landscapes. Having better flexibility for adjusting exposure in post processing is another major benefit that often comes in handy for landscape scenes.
If you’re used to working with JPGs and you’re uncomfortable making the switch to RAW files, set you camera to capture each shot in both formats. This will take up more space on your memory card and on your hard drive because each photo will be duplicated, but it can be a good bridge while you get more comfortable working with RAW files. Once you’re comfortable, set the camera to shoot only in RAW except for the rare situations that may require you to use JPG instead.
7. Be Equipped
There are a few accessories that can be very useful for landscape photographers. The first is a study, lightweight tripod. Tripods are a necessity if you’ll be doing much work in low light, such as sunset or sunrise. If you’ll be doing a lot of hiking to get to your preferred locations the weight of the tripod can be very important. Carrying a heavy tripod is no fun, so get one that is lightweight or you’ll probably opt to leave it at home when you expect to do a lot of walking.
When you’re using a tripod it’s also helpful to have a shutter release cable so that you can take photos without touching the camera. This helps to reduce even the smallest amount of shake created by pressing the trigger.
Filters can also be a good addition to your camera bag. Polarizers and neutral density filters come in handy for landscape photography. A polarizer will help to reduce glare from reflective surfaces, like water, and it can also help to create more contrast in the sky. For more information, see How To: Using a Circular Polarizer.
Neutral density filters are helpful for situations when you want to use a longer shutter speed without over exposing the photo. An example would be when you want to use a slow shutter speed to blur or soften flowing water, but the sunlight will lead to an overexposed photo with the slower shutter speed. The ND filter will allow you to slow down the shutter speed without letting too much light in, preventing the over exposure. For more information, see How and When to Use ND Filters.
Graduated neutral density filters are also helpful. Unlike a standard ND filter, the graduated filter transitions from darker to lighter. This is helpful with landscapes where you have a dark foreground and a bright sky. The graduated filter prevents the sky from being overexposed and the foreground from being under exposed. For more information, see ND Grad Filters: What Every Photographer Should Know.
8. Follow the Rule of Thirds (sometimes)
The rule of thirds is probably the most commonly followed “rule” for composition, and it can be very helpful with landscapes. Placing your focal point or an object of interest one third of the way into your frame can lead to some beautiful compositions. The rule of thirds is often helpful when it comes to placing the horizon. If the sky is the most interesting part of the photo, compose the shot so the sky takes about about two thirds of the photo.
If the sky is less interesting than the land, as is the case in the photo below, compose the shot so the sky takes up just one third of the photo.
That being said, there are always situations when it is best to ignore the rules. Don’t be afraid to experiment and try compositions that don’t fit the typical guidelines.
9. Look for Color
Landscape photos can generally be made much more interesting with the inclusion of color. The color may come from the sky, flowers and trees, or other objects. If a scene is totally lacking in color, you may be able to include objects in the composition that will introduce some color.
The yellow sunflowers in the photo below provide an awesome punch of color.
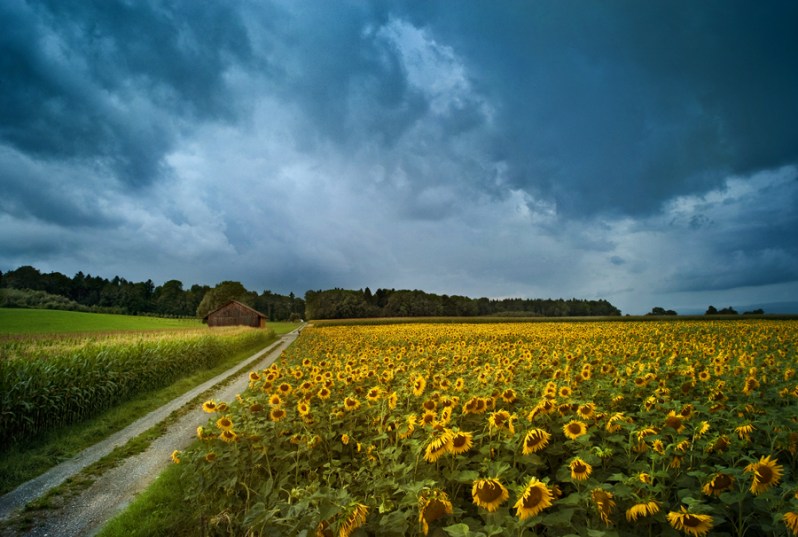
Photo by Daniel Zedda
10. Look for Foreground Interest
Landscape photos are often most interesting and captivating when there is a focal point in the foreground. Look for things like flowers or rocks to be included in the foreground of your compositions.
In the photo below, the dead tree creates a lot of intrigue in the foreground.
11. Use a Small Aperture (generally)
With landscape photos you’ll usually want as much of the scene as possible to be in focus. In order to accomplish this you’ll want to use a small aperture, which will be a larger f-stop number. The specific f-stop that will be ideal will depend on a lot of factors, including the camera and lens that you are using. If your shot does not have a focal point in the foreground you may want to try something around f/11 to f/16. If your composition does include a foreground element you may want to try f/16 to f/18. These numbers are generalizations. The best thing to do is experiment and find what creates the sharpest photos with your camera and lens. Take your tripod out and photograph the same scene at several different f-stops. Then view the full size image on a monitor and compare to see what produces the sharpest photos. Once you know how your camera and lens perform you’ll have a better idea what f-stop to use in the future.
Of course, there may be some situations where you want to use a small f-stop to blur the landscape in the distance, but these situations will not be that common with landscape photography.
For more information, see The Ideal Aperture for Landscape Photography.
12. Try Exposure Bracketing
Exposure bracketing, with the help of a tripod, can be very helpful for making sure that you get an image with the best exposure. With automatic exposure bracketing (AEB) your camera will take a series of photos of the same scene at different exposures. Bracketed shots are often used to create high dynamic range (HDR) images, but these bracketed shots can also be used to ensure that you get a properly exposed image even if you aren’t planning to create a composite HDR image. The first shot with AEB will be the attempt at a properly exposed shot, and it will be followed by under exposed and overexposed shots. These alternate exposures can be helpful if you find that your original exposure was a little off. The specifics of AEB will vary from one camera model to the next. For more information, see Bracketing Explained, Auto Exposure Bracketing and Auto Exposure Bracketing Settings by Camera Model.
13. Don’t Hate HDR
HDR photography often seems like something that most photographers either love or hate. In most cases, those that hate HDR photos are really opposed to the overdone, drastic effects sometimes created and often associated with HDR photography. The truth is that HDR images don’t have to be unrealistic or over-the-top. In fact, it’s possible to view an HDR photo without even knowing that it is HDR. The purpose of exposure blending is to allow you to create an image with excellent detail in both the shadows and the highlights, and it’s not necessary to create a grungy, harsh looking image with HDR.
One of the most popular options for creating HDR images, Photomatix Pro, recently released a new version that includes improved options for creating realistic looking HDR images. So if you don’t like the typical HDR photos that you see online, don’t write off HDR as a technique just because of how it is often used or presented. With landscapes there will often be situations where it is challenging to properly exposure the photo for both the shadows and the highlights. In these situations HDR can be a possible solution.
14. Explore
Although my first tip was to research your location ahead of time, there is something to be said about exploring. Many times you may be able to fund unique locations and scenes by wandering and getting away from the common spots in a particular destination. When you have the time, don’t be afraid to wander and see what you can find.
15. Get a Unique Perspective
Some of the most interesting photos use perspective to create interest. This is especially helpful if you’re shooting at a popular location. Rather than taking the same photograph that you’ve seen a hundred times from other photographers, find a way to get a unique perspective. That perspective can make your photo of a common scene much more intriguing and it will stand out.

