Free Photography Bundle ($180 value): PS actions, LR presets, photo overlays, & print templates!
Get it here.
This article is a part of our series Photo Editing in Lightroom 101. Throughout the series we’ll cover the details of Lightroom’s library and develop modules and how you can use Lightroom to improve your own photos. As new articles are published they will be added to this page. If you don’t want to miss future articles in the series, please subscribe to our RSS feed or our email newsletter.
In previous articles we covered Lightroom’s library module and the basic features of it that allow you to organize your photos efficiently. Now, moving on, we will be looking at the develop module, which is where you will process your photos. The develop module is very powerful and once you have a basic understanding of the tools and how they work you will find that you can quickly improve photos.
Once of the great things about Lightroom is that it performs non-destructive editing, meaning that you aren’t changing your original photo and you can revert to the original at any time. This allows you to experiment during your processing without fear of doing any harm to your photos by making changes.
In this introduction article we will take a look at the user interface of Lightroom’s develop module. To get to the develop module you can click on “develop” at the top right of your screen, or use the keyboard shortcut “d”.
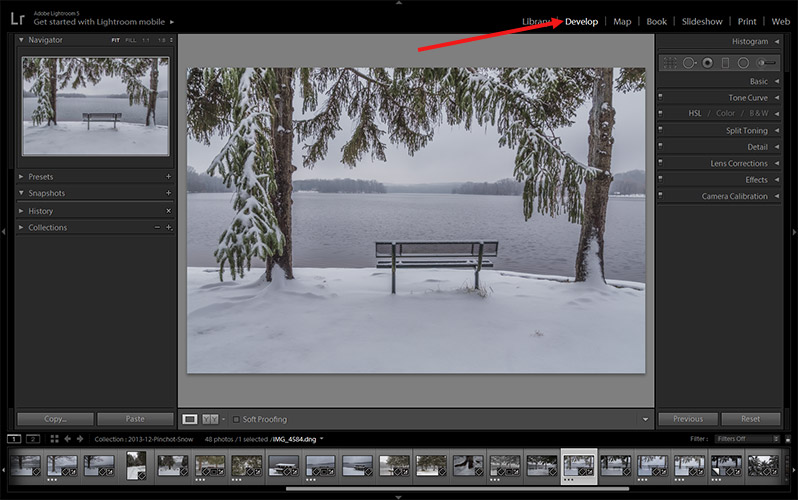
The screenshot below includes numbers for each item that we’ll be discussing in the article.

1. Navigator
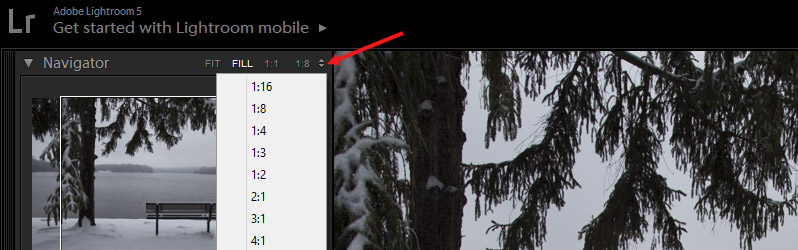
The navigator, if it is opened, will show a thumbnail of the selected photo. You can open or close any of the items on the left and right side of the develop module by clicking on the little arrow. If the arrow is pointing to the side it is closed and you can open it by clicking. If the arrow is pointing down it is open and you can close it by clicking.
The navigator allows you to control how zoomed in the photo will be. You have options for fit, fill, and other specific ratios. Fit will make the widest side of the photo fit the available space, so it is as large as possible while allowing you to see the full photo. Fill will make the shortest side of your photo fill the available area. On a landscape oriented photo this will not allow you to see the left and right edges, and on a portrait oriented photo it will not allow you to see the top and bottom.
You’ll then have options like 1:1, which shows the photo at 100%, 1:8, and other ratios. To see more options, click on the little up and down arrow to the right of 1:8.
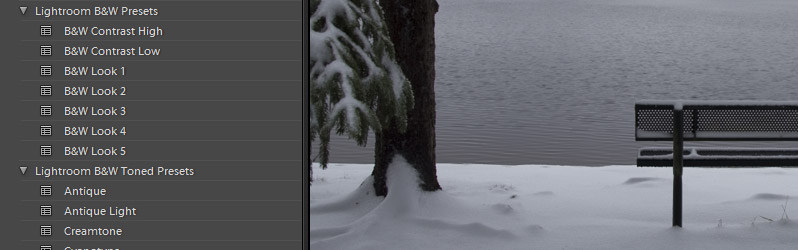
2. Presets
Presets allow you to quickly apply specific effects to your photos. They are a great way to speed up your editing process, but no preset will work perfectly on every photo. Think of presets as a starting point. After applying the preset you can make changes as needed to suit your specific photo.
Lightroom comes with some presets installed by default, and you can also download and purchase presets from different vendors (see our free Lightroom presets here and see our premium Lightroom presets here). And of course, you can also save your own presets to be used later.
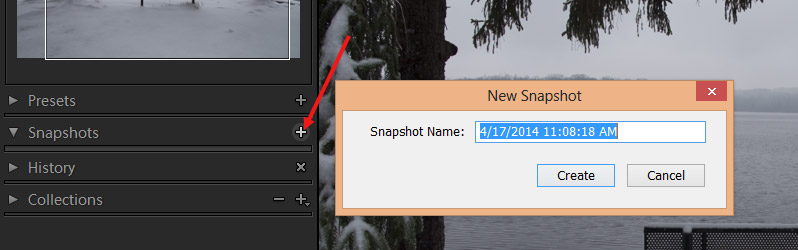
3. Snapshots
Snapshots allow you to save your photo in its current state, and you can revert to that state at any time in the future. If you’re doing a lot of work with a particular photo it can be helpful to create snapshots at various points. While the history panel (we’ll look at that next) does allow you to go back to specific stages of your editing process, the history can quickly become really large and a little cumbersome to manage. If you have just a few snapshots at specific stages it’s easier to manage.
To create a snapshot you can click on the plus icon to the right and give it a name. By default it will fill the name with the date and time, but you’ll probably find it to be more helpful to give your snapshot a descriptive name. After you’ve created snapshots they will be listed under “snapshots” as long as it is open. Click on one to open it.
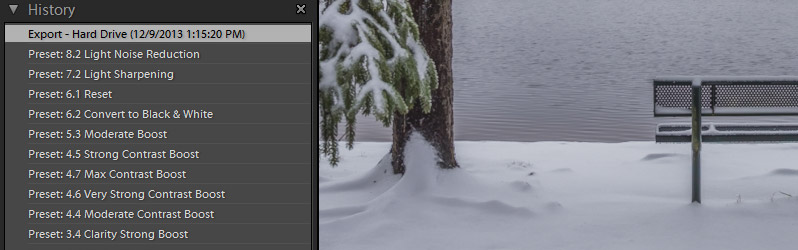
4. History
The history lists all of the changes that have been made to a photo in the develop module. You can revert back to any stage very easily by clicking on the step in the history.
5. Collections
We talked about collections in the section of this series that covered the library module, and if you don’t understand how collections work please refer to this article. In the develop module you can use the organization of your collections to select the photo that you want to develop.
6. Copy and Paste
Copy and paste allows you to copy the changes that have been made to one photo and apply them to another photo. This can be helpful if you have multiple photos that are very similar, with the same subject taken in the same lighting and in the same session.
To use copy and paste you will find need to do some editing with one of your photos. Then click on copy and it will open to options.

You’ll choose the things that you want to copy, and click “copy”. For example, if you don’t want exposure changes to be copied and applied to the other photos, leave exposure unchecked.
Then to paste, just select the photo that you want to apply the changes to and click on the “paste” button.
7. Filmstrip
The filmstrip at the bottom of the screen allows you to select images. In the example screenshots I am working from a collection of winter photos that I took at a park, so the filmstrip shows the other photos from that collection.
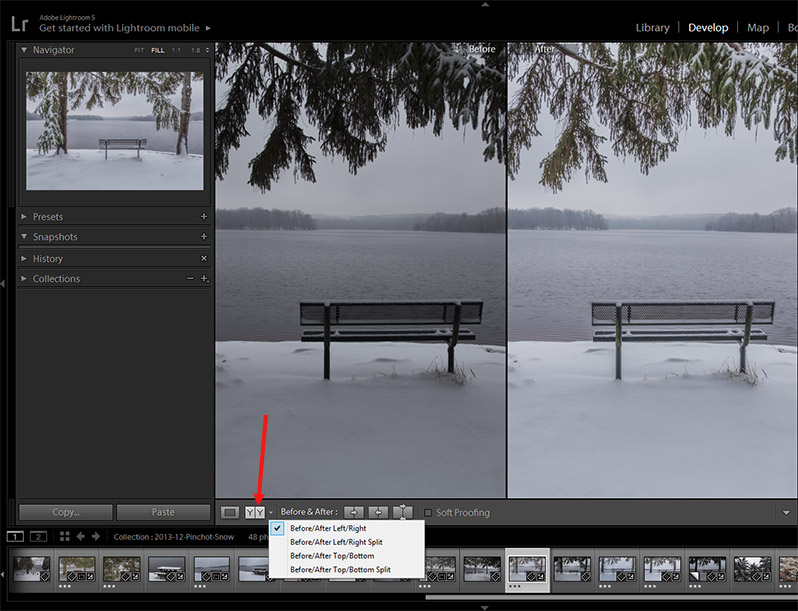
8. Loupe View, Before and After
When you’re in the develop module you will be using the loupe view by default, which shows the photo that you are working on. If you want to compare your current version of a photo to what it looked like before you made any changes you can use the before and after view. When you click on the icon to activate the before and after view it will give you a few options about whether you want to before and after photos to be shown on the left, right, top, and bottom.
9. Histogram
Near the top right of the develop module is the histogram, which you can use to help you in the editing process. The histogram will adjust as you apply different changes.
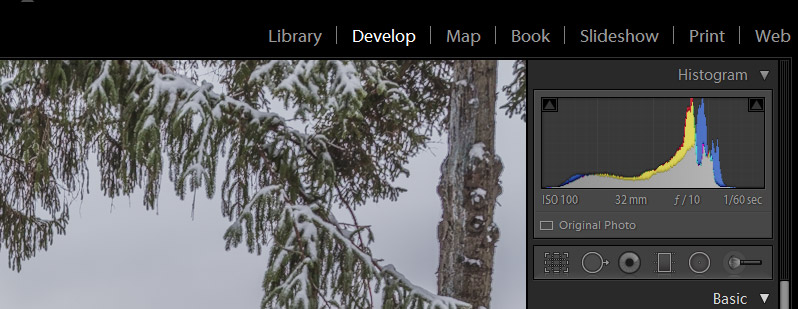
10. Filters and Tools
The are several different filters and tools that you can access using the icons just below the histogram. We won’t go into a lot of details about each of the tools here, but we will cover them later in the series.
– Crop
The crop tool obviously allows you to crop your photo. You can crop it with the same aspect ratio as shot, or you can crop it for specific ratios, like an 8×10 print. And since this is non-destructive editing you can always undo the crop later.
– Spot Removal
The spot removal tool can be used to make fine touch ups to a photo, such as removing blemishes.
– Red Eye
The red eye tool obviously allows you to fix red eye in your photos.
– Graduated Filter
The graduated filter can be used for a number of different purposes. It works similar to a linear gradient that makes a gradual adjustment. One common use is to replicate the effect of a graduated neutral density filer by applying an exposure adjustment that fades gradually. in landscape photos where you have a relatively straight horizon you can use a graduated filter to lighten or darken either the area above or below the horizon. We’ll take a much more detailed look at the graduated filter later in this series.
– Radial Filter
The radial filter was introduced in Lightroom 5. It is similar to the graduated filter except that it works with circles and ellipses instead of in a linear fashion. The most common use of the radial filter is to create custom vignettes.
– Adjustment Brush
The adjustment brush allows you to make changes to a specific area of the photo by running the brush over the areas that you want to change. You have control over the size and feather (level of hardness or softness at the edges), so it can be applied to a very small area or to a large area. You can use adjustment brushes for things like dodging and burning, smoothing skin, whitening teeth, and more.
11. Editing Controls
At the right side of the develop module you’ll have all of the controls for developing your photos. We’ll cover these controls in more detail in upcoming articles, but for now we’ll take a quick look at what is available. To open any of these sections click on the arrow to the right of it.
– Basic
In the basic section you can select a treatment of color or black and white. You can also adjust the white balance (temperature and tint), exposure, contract, highlights, shadows, whites, blacks, clarity, vibrance, and saturation.
– Tone Curve
The tone curve is a very powerful tool that we’ll cover in more detail in a future article. With it you can adjust the RGB channel, or you can select and edit specifically the red, green, and blue channels.
– HSL/Color/B&W
In HSL you can increase or decrease the hue, saturation, and luminance of any specific color. The color section does the same thing as HSL, it just lists the colors individually rather than all together. Click on B&W to convert a color photo to black and white. Within this area you can adjust the luminance of specific colors to create the look that you want.
– Split Toning
Split toning allows you to add tones to the highlights and shadows of your photos. This can be used with black and white conversions to give a subtle color effect, or it can be used with color photos to give a soft effect.
– Detail
In the detail area you can apply sharpening and noise reduction. Most of your RAW files will need some small adjustments here.
– Lens Corrections
The options in the lens correction area can be really helpful for things like removing chromatic aberration, and correcting vignetting and distortion created by the lens.
– Effects
In the effects area you can add a vignette and grain to the photo.
– Camera Calibration
Camera Calibration allows you to change it from the default “Adobe standard” to something specific for your camera or a setting like landscape or portrait. If Lightroom recognizes your camera you should see some options here that are from your camera. Each sensor is a little bit different, so Adobe standard will probably be just a little bit off from any of the options from your camera. The changes will be subtle, but it can be a good starting point.
12. Previous and Reset
The “previous” button allows you to apply the same develop settings that you used on a previous photo. For example, if you develop one photo by adjusting exposure, contrast, and clarity, then select another photo and click the “previous” button it will apply the same settings for exposure, contrast, and clarity. It does not have to be the previous photo in the filmstrip, just the previous photo that you had selected. Using the “previous” button applies ALL of the develop settings from the previous, which includes things like adjustment brushes, cropping, graduated filters, etc. So if the subjects in the photo have moved you may need to make some adjustments after hitting the button.
The “reset” button will simply remove all of the develop settings that have been applied to the photo. If you’re working on a photo and you don’t like the way it is looking and you want to scrap it and start over, hit the “reset” button. You can always go back in the history even after resetting it.
That’s it for the intro to the develop module. We’ll move on and cover specific items in more detail in upcoming articles.
If you don’t want to miss the other articles in this Photo Editing in Lightroom 101 series, please subscribe to our RSS feed or our email newsletter. As new articles are published they will be added to the series page, which will serve as an index for the entire series.

