Free Photography Bundle ($180 value): PS actions, LR presets, photo overlays, & print templates!
Get it here.
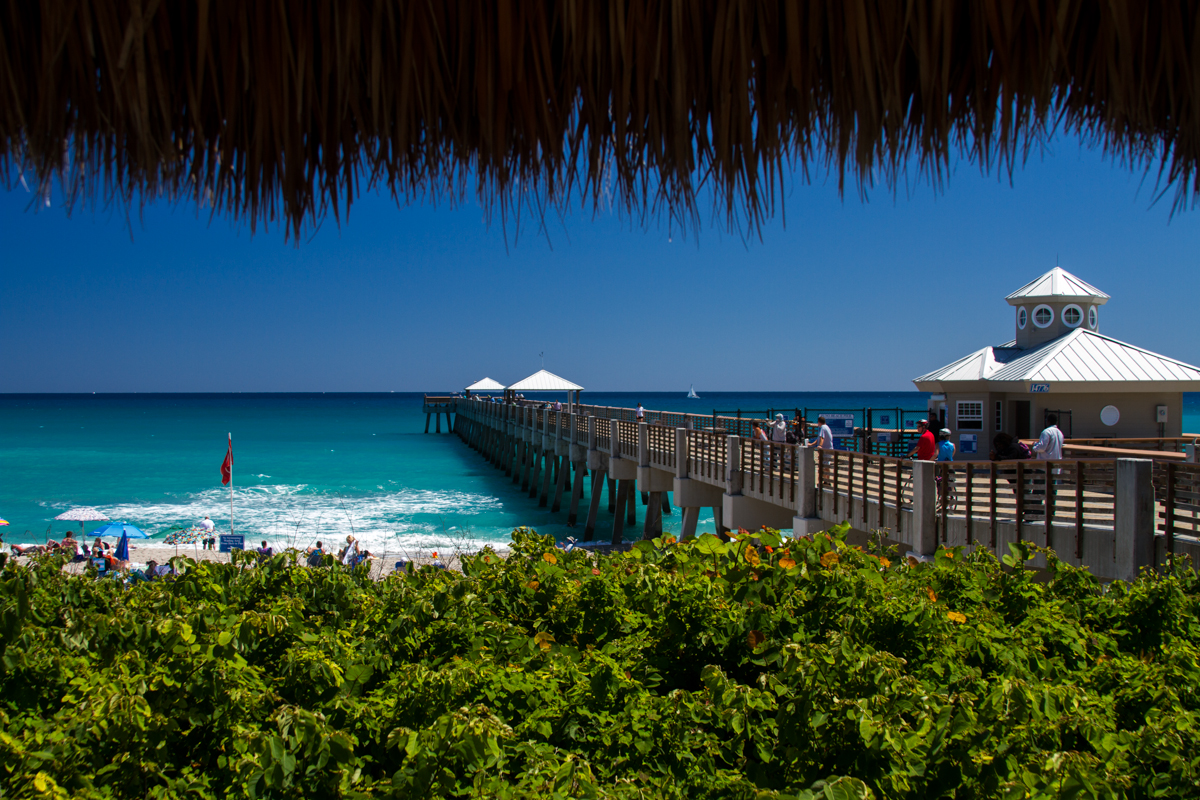
The dark overhang of the roof fronds makes this shot a classic “meter cheater”. Use Center Weighted Metering to expose for the scene beyond and reclaim the frond overhang by lighting it up in post.
In the old days a light meter was something the size of a hand grenade that you carried in your pocket or hanging from your neck, and they were expensive. It seems hard to believe now but there was a time when it was necessary to measure the light coming in and the light reflected off the subject and then figure out the exposure and adjust it a little above and below, called bracketing, all by hand. You’d find out if you were right a week later when the prints came back.
Today the camera handles exposure metering but exactly how they carry out that task is different between camera manufacturers, and even between camera models. There are some qualities they have in common but the terms may be different for your particular camera model and you may need to dust off the user manual to find exactly where some of these features are hiding. It’s a testament to how good camera metering is these days that manual metering adjustment are sometimes buried in camera menus.
Metering Basics
With a few modern variations, cameras generally still have three basic metering modes:
- Evaluative Metering (Canon) or Evaluative/Matrix Metering (Nikon)
- Center Weighted Metering
- Spot Metering
Evaluative Metering
This is the default setting on most cameras and one employed in the automatic modes of most cameras. With Matrix Metering the camera divides the entire frame into sections, called zones, and analyzes each on an individual tonal basis. Then the camera takes the point of focus and assumes that zone is the most important and weights the exposure accordingly. It’s a little different with Nikon but that’s the gist of it.
Evaluative metering is a good default choice and you should use until you run into a “meter cheater”, a picture that doesn’t play by the default rules.
Center Weighted Metering
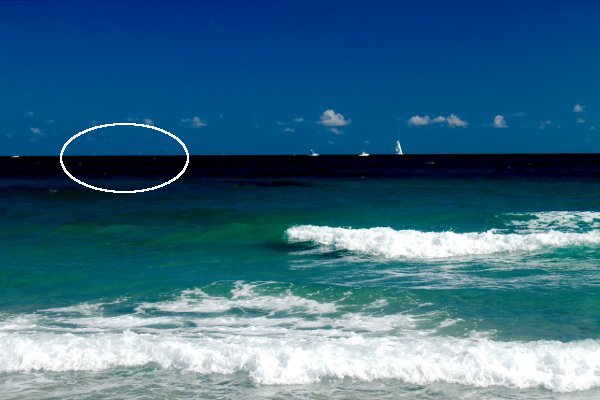
I use center weighted pattern metering and lock the exposure before reframing. In this picture the circle represents the approximate area I would use to set the exposure. A circular polarizer helps reclaim some of the details in the surf and clouds.
This metering mode is for times when metering the entire frame is not optimal. In Center Weighted Metering your camera’s internal computer uses the center of the frame and takes average readings from inside that zone, ignoring most everything outside that center zone. This metering mode is helpful in shooting situations where there’s strong back lighting and you want to preserve details in a subject that may be in the shadows.
This is the mode I use nearly all the time, although I’m not always metering the center of the shot. I’ll use center weighted metering for the parts of the shot I think are most important, lock the exposure and then reframe. Since I shoot a lot by the water, I’ll frequently expose for the intersection of the sky and water, knowing that’s going to blowout the highlights in the clouds and wave caps. Or I can cheat and add a circular polarizer which cuts down on the reflected light from waves and clouds. Then I get my sky and water colors and keep the detail in the highlights. The highlights will still be a little blown but not as bad.
Spot Metering

Old school metering with an incident light meter.
In this mode your camera uses only one tiny zone that you select to calculate the proper exposure. Spot Metering is frequently used by wildlife photographers who may be taking a picture of a small bird or animal knowing that they’re going to crop out of the background in post. It’s also helpful to spot meter portraits where you’ll be spot metering skin tones and the eyes in front of a neutral background. Switch to spot metering any time your subject occupies a small area of the entire shot.
Switching Exposure Modes
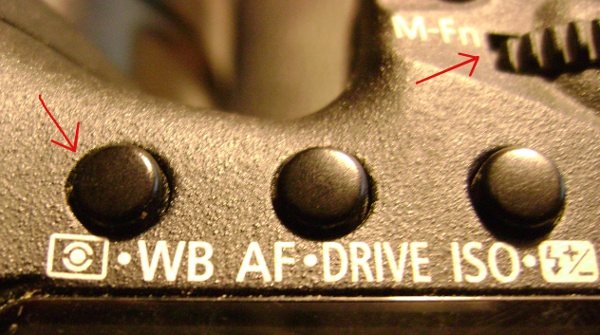
On a Canon 7D the button on the left puts you into the metering menu and you scroll between them with the M-Fn scroll wheel.
Switching between exposure modes is going to be specific to your camera brand and model. On many Canon cameras the metering options are accessed via a small button on top of the camera and changed via the M-Fn scroll wheel. On a Nikon D5100 it’s a menu option contained in the Quick Settings screen. You may need to dust off your camera manual to find the exact way to access the metering options in your camera. Many times you’ll have to be in a particular shooting mode before those menu options become available to you.
The longer you shoot, the more likely you’ll discover a metering mode that you use probably 90 percent of the time and you’ll learn to recognize the shooting situations where you need to change it.
We’ll be publishing more articles that cover the basic fundamentals of photography. If you want to make sure that you don’t miss any articles please join our newsletter list.

