Free Photography Bundle ($180 value): PS actions, LR presets, photo overlays, & print templates!
Get it here.
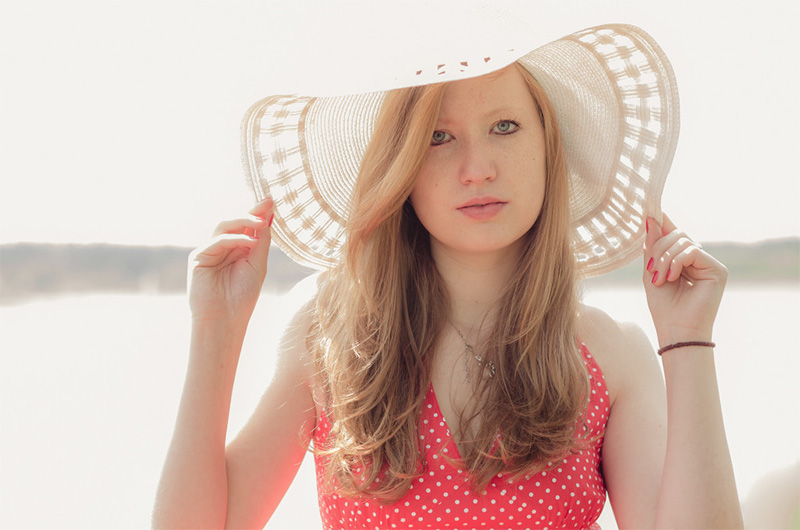
Photo by Jörg Schreier
To new photographers, it might seem as though the best time to take photos is when the sun is out and cascading warm, bright light down onto the world. The reality is, trying to take photos in the shining midday sun can actually make it more difficult to take a properly exposed photo–in fact, many photographers prefer to shoot on overcast days! The reason is because the sun, especially when it’s overhead during noon hours, tends to cast shadows which rarely do any favors for a nice composition. Whereas, when it’s overcast and cloudy outside, the light will be softer and more appealing. That makes a huge difference when you’re shooting portraits and don’t want dark shadows falling under your subjects eye (or anywhere on the frame for that matter).
Unfortunately, we can’t always wait for a cloudy day to go take photos. Instead, we have to learn how to make the best of what we have to work with–and if you’re dealt a sunny day, that means knowing how to avoid letting unsightly shadows become the star of the show. To help get you on the right track, here’s a few tried and true best practices that can help you do just that.
1. Find The Open Shade
Not all shadows are bad if you know how to use them to your advantage. Take for instance, open shade. Open shade can be your best friend if you’re taking portraits in the midday sun. If you’re not familiar with open shade, it’s the kind of shade you’ll find on the sides of buildings, under large trees, and wide open doorways. When you’re looking for open shade, look for large shadows that have some light reflecting back into them. That’s made more simple by moving your subject closer the edge of the shade where it starts to meet the sunlight. In other words, don’t sit your subject too deeply into the shadow or you’ll miss out on beneficial light that’s being reflected back into the shade.
Photo by Peter McConnochie
In the photo above, the photographer has placed his subject in the open shade, facing the light being reflected back from the street. When it’s possible, try experimenting with a few different angles to help you find the most flattering look.
2. Fire Up The Old Flash
It may seem counterproductive to use a flash when the problem you’re trying to overcome is too much light, but it is actually a very useful technique. You can use a flash to fill in any shadows that my be cast on your subject’s face, and give the overall light a more balanced look.
In most cases, the built in on-camera flash will be sufficient–if your camera has a setting to do so, set the flash to fill mode. If you’re not sure how to do so, take a look inside the user manual that came with your camera.
Photo by Alex Naud
Alternatively, you can bring along a reflector, especially if you do not have a flash or don’t want to use one. Collapsible reflectors are super portable and easy to fit into a bag. I prefer to use a 5-in-1 variety so I can control the color temperature of the reflected light–they work like a charm and there are plenty of affordable options if you’re working on a tight budget.
3. Brighten The Background
Another issue you’re likely to run into when shooting in the midday sun is finding a balance between the background and the subjects. A lot of times, the backgrounds of photos taken in the overhead sun appear overexposed and blown out. This can be corrected by using a graduated neutral density filter, but keep in mind a bright background isn’t necessarily a bad thing. In fact, you can use it to your advantage by using it in your composition to help draw the viewers eye to your subject.
For example, in the photo below, the photographer blew out parts of the sky to help frame the couple. He also used a reflector to help bounce light on to them and balance out any shadows.
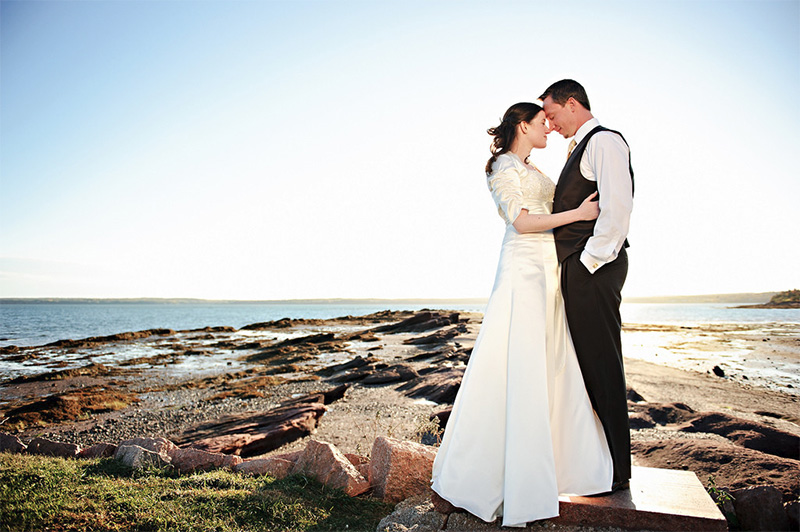
Photo by Sean McGrath
But, that’s not say overexposing the sky is always going to be the right choice. For an opposite effect, another option would be to expose for the sky and allow your subjects to be under-exposed to create an interesting silhouette.
Because there are so many different ways to go about it depending on your subject matter and shooting environment, try to get some practice in whenever you have the chance. Be sure to try out several methods for each shot, to see what works best for you and what you have to work with.

