Free Photography Bundle ($180 value): PS actions, LR presets, photo overlays, & print templates!
Get it here.
This article is part of our series Photo Editing 101 by Ian Pullen. This series will cover all of the basics of using Photoshop for editing photos. If you’re just getting started with Photoshop or photo editing, or if you’re looking to improve your skills in this area, this series will provide an excellent foundation. If you want to make sure that you don’t miss future articles you can subscribe to our newsletter or follow us on Twitter, Google+, or Facebook. You can also find the articles that have already been published by visiting the Photo Editing 101 course page.
Photoshop makes it very easy to make small cosmetic improvements to photos of people and I’m going to show one technique for whitening teeth. A common complaint from people who don’t like having their photo taken is that they don’t like their smile, but a little Photoshop magic can help alleviate this problem.
There are a few different ways to approach this task and in some cases just using the Dodge tool may give sufficient results. However, I’ll demonstrate a technique that uses a Hue/Saturation Adjustment layer to brighten the the teeth. As discoloration of teeth is almost always of a yellow hue, this tool is very well suited to this purpose.
You’ll also see that I’m using a close up shot of a mouth which means that the gums are more apparent than a photo that frames the whole face. This means that a little extra care needs to be taken with masking, but otherwise the technique remains the same. If the teeth are not so large in your photo, you should find this is a relatively quick edit to make.
Add and Edit a Hue/Adjustment Layer

The first step is to add a new Hue/Adjustment layer to your image. You can either go to Layer > New Adjustment Layer > Hue/Saturation or, if the Adjustments palette is open, just click the Hue/Saturation icon that is second from the left in the middle row.
Whiten the Teeth
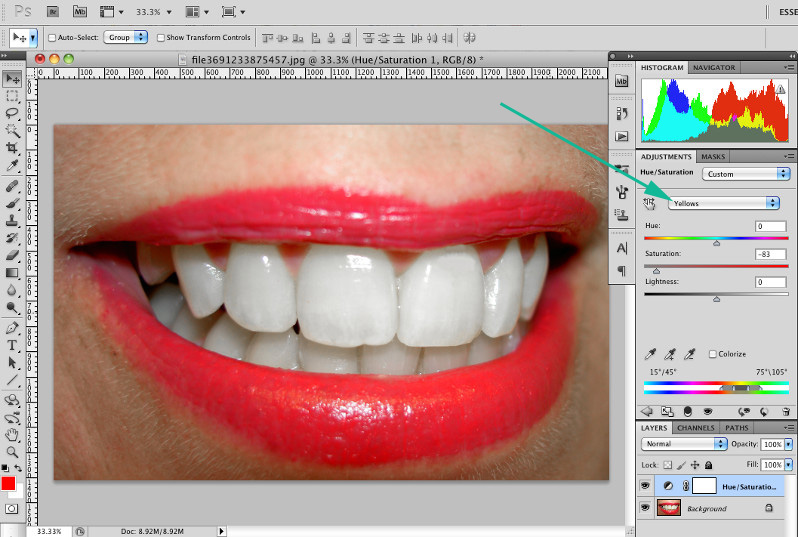
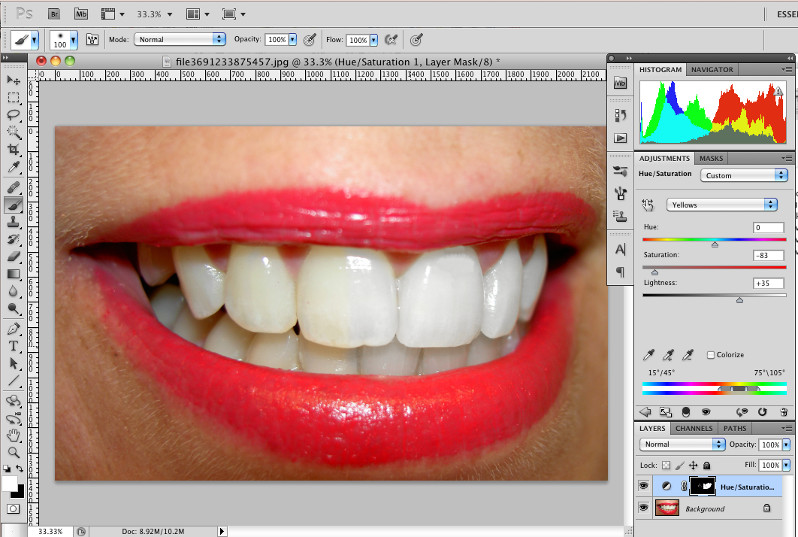
Now click on the second drop down menu that will initially be labelled Master and switch it to Yellows. This means that any changes that you now make will only affect pixels with yellow color values.
If you drag the Saturation slider to the left, you should see that any yellow tint to the teeth is removed, making them appear whiter. You need to take care that you don’t produce an unnatural appearing result. In my photo which is zoomed in on the teeth, I’ve set the Saturation slider to -83, which means that there is still a little bit of color to the teeth as it looked too extreme a change set to -100. However, you may find that -100 looks fine on your photo.
Brighten the Teeth

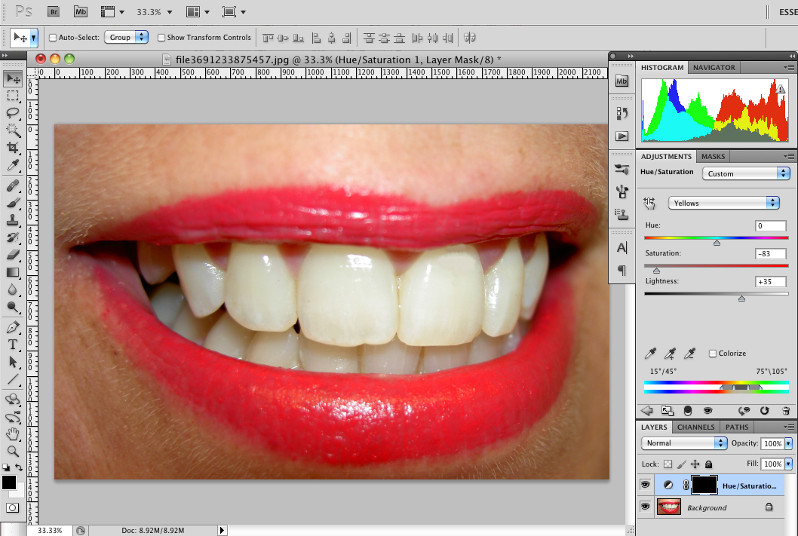
We can also use the Hue/Saturation layer to brighten the teeth a little too. To do this, just slide the Lightness slider to the right a little. Again take care not to overdo the effect – I set mine to 35.
At this point, you’ve probably noticed that we’ve haven’t just adjusted the teeth, but the complete photo. In my case the result doesn’t look too bad, but I’ll still show you how to complete this technique by using the Hue/Saturation layer’s Layer Mask to target just the teeth.
Fill the Layer Mask with Black
If you can’t see the Layers palette, go to Window > Layers and then click on the white rectangle icon in the Hue/Saturation layer. That is the button that means you’re now editing the mask. Next go to Edit > Fill and set the Use drop down menu to black. You’ll see that the little mask icon changes to a black rectangle and that your photo looks like it did when you first opened it.
Paint Over the Teeth to Create the Mask
In the previous step, we set the mask to hide all of the Hue/Saturation layer which is why the adjustments that we made earlier are no longer visible. We can now erase the parts of the mask where the teeth are so that they are whitened again.
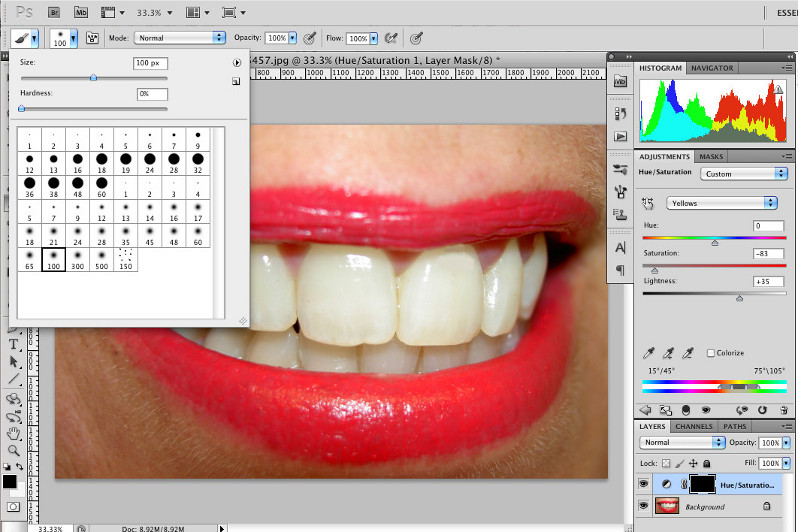
Click on the Brush tool from the Tools palette and in the tool options bar, click on the second drop down menu and select a soft edged brush. You may need to adjust the size of your brush to give you a suitable size for painting over the teeth. Before you start painting, ensure that the Foreground color is set to white – pressing the D key on your keyboard will set this.
Now you need to quite literally paint over the teeth. As you do so, you should see that they start to whiten again as the Hue/Saturation layer is exposed.
In this screen shot, you should be able to see that parts of the teeth are white, while some parts haven’t been adjusted yet as I haven’t painted over them. If necessary, change the size of your brush to reach smaller areas. Once you have finished painting over the teeth to set your mask, you may want to change the Saturation and Lightness sliders to fine tune your result.
Conclusion
This is just one way to whiten teeth in Photoshop and you may find other ways that you prefer. You may also prefer creating your mask first before adding the Hue/Saturation layer, which can be done quite quickly using the Quick Mask tool to paint over the teeth and then invert the result.
Image Credit: jdurham
See more articles in the Photo Editing 101 series.

