Free Photography Bundle ($180 value): PS actions, LR presets, photo overlays, & print templates!
Get it here.

This article is part of our series Photo Editing 101 by Ian Pullen. This series will cover all of the basics of using Photoshop for editing photos. If you’re just getting started with Photoshop or photo editing, or if you’re looking to improve your skills in this area, this series will provide an excellent foundation. If you want to make sure that you don’t miss future articles you can subscribe to our newsletter or follow us on Twitter, Google+, or Facebook. You can also find the articles that have already been published by visiting the Photo Editing 101 course page.
This article is going to introduce you to the Levels adjustment feature in Adobe Photoshop. If you’re just starting out with using Photoshop to enhance and edit your photos, the Levels tool is a good feature to start with as it it quite easy to understand and offers good results relatively easily.
How Do You Access Levels in Photoshop?
You’ll actually find two versions of Levels in Photoshop and they look and work the same, though there is a fundamental difference. The first you will find by going to Image > Adjustments and this allows you to make a permanent adjustment to your photo.
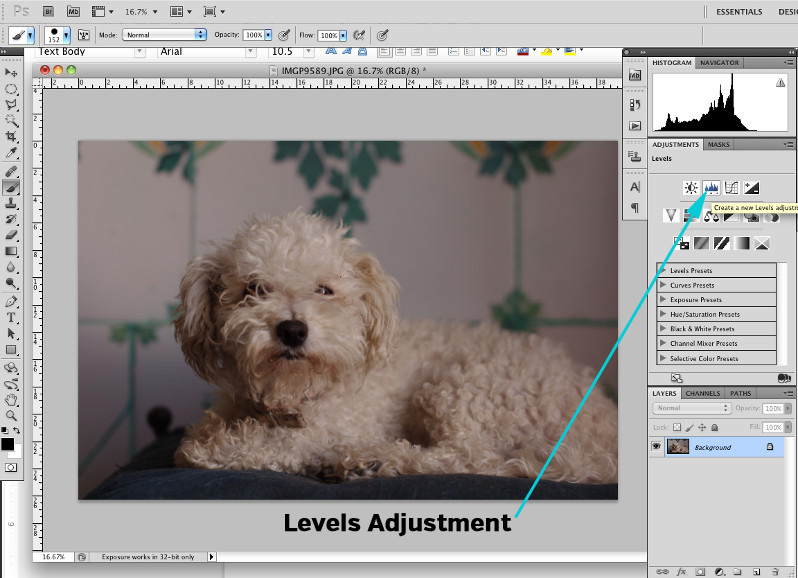
The other option, and the preferred option, is to go to Layer > New Adjustment Layer and select Levels from that list. This adds a Levels Adjustment Layer to your image and while the effect appears the same, this is more flexible as you can make changes to the Levels settings later if you wish to change the effect a little. You can even delete the layer altogether without affecting any other edits that you subsequently made to your photo. This greater flexibility means that you should always choose to use Adjustment Layers when they are available.
If the Adjustments palette is open, you can also add a Levels Adjustment Layer by clicking the Levels icon on the main menu (see the arrow on the screenshot above).
What Do Levels Look Like?
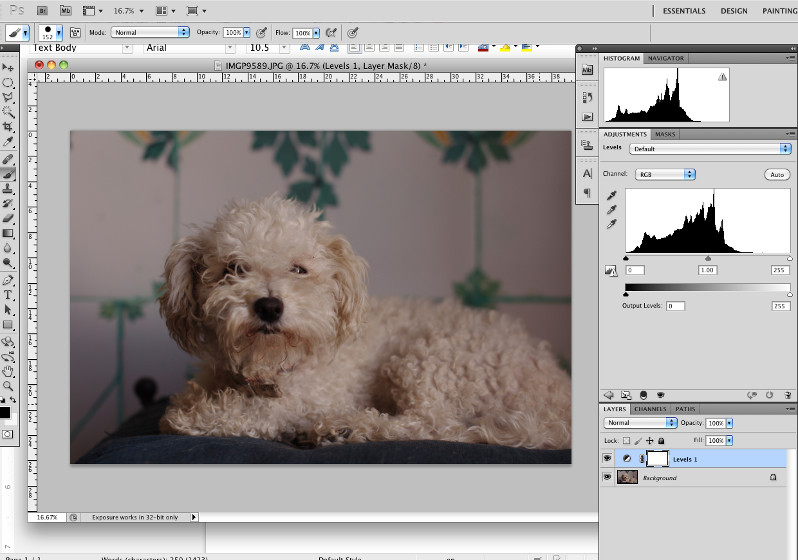
I’ve opened a slightly under exposed photo, that’s a little lacking in contrast, in Photoshop and have applied a Levels Adjustment Layer to it with no changes made to it yet.
The graphic that looks like a mountain range is called a histogram and that represents the full tonal range across the image, from black through to white. Where the peaks are higher, it indicates that there are more pixels in the photo that have that tonal value. If you look at the right of the histogram, which is where the lighter pixels are represented, you can see that almost a quarter of the graph has no pixels. This coincides with the image which we can see has very few lighter white areas. Interestingly, at the the other end of the histogram, we can see that there are also very few pure black pixels as the graph tails off almost to nothing at that end.
If you change the Channel drop down menu, you can also see specifically how the red, green and blue tonal ranges are spread across the image, but we’re just going to concentrate on the composite RGB values.
How Do You Use Auto Levels?

Life doesn’t get much easier than making your Levels adjustments using the Auto feature. Just click the Auto button and Photoshop will automatically attempt to reset the levels of the image to give what it thinks is the best effect.
In the screen shot, you can see that the histogram has been stretched so that pixels now reach to both ends. The result on the image is that there is now greater contrast, with more lighter and near white areas. This is definitely an improvement on the original, but perhaps the contrast is a little to high, with some darker shadow areas having been added.
How effective this is will vary from photo to photo, but it can be worth trying, even if just to use as a starting point.
How Do You Manually Adjust Levels?
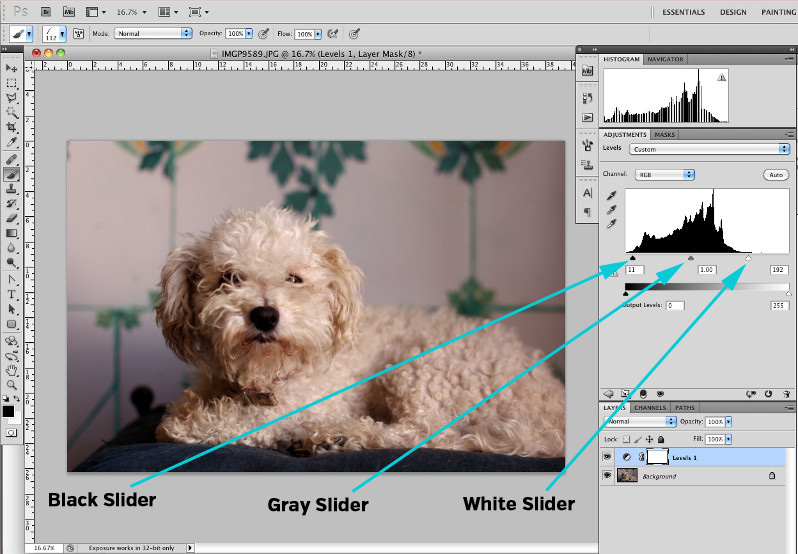
You can achieve a similar effect by adjusting the Levels manually using the slider controls below the base of the histogram. In my case, I dragged the white slider in from the right until it roughly aligned with the right hand edge of the histogram. This has the effect of lightening the pixels at this point so that they appear to be white or very near to white. All the other pixels that have a tonal value greater than mid-gray are also lightened.
Although the histogram reaches all the way to the left, I moved the black slider to the right a little which has just added some more pure black shadows to increase the contrast.
In this case I left the mid-gray slider untouched, but this can be moved to the right to darken the image or to the left to lighten it.
How Do You Use the Eye Droppers?

There is also one other way to use the Levels adjustment and that is to use the eye dropper controls to the left of the histogram.
Firstly click on the top eye dropper and then click on a point in the photo that you believe is the darkest point. I clicked on the nose. This has the effect of setting any pixels with a tonal value equal to or darker than this point to black.
Now select the bottom eye dropper and click on the lightest point in the image. This will set any pixels with the same tonal value or a lighter tone to white.
Finally you could use the gray eye dropper to try and select an area that you believe to be 50% gray, but this isn’t easy and, usually, you may be better off manually adjusting the gray slider if it needs tweaking. This is because if you select an area that doesn’t have equal amounts of red, green and blue in it, you can find that you introduce an unwanted color cast. This can also be an issue with the black and white droppers, but it is less apparent in most cases.
How Do You Use Output Levels?
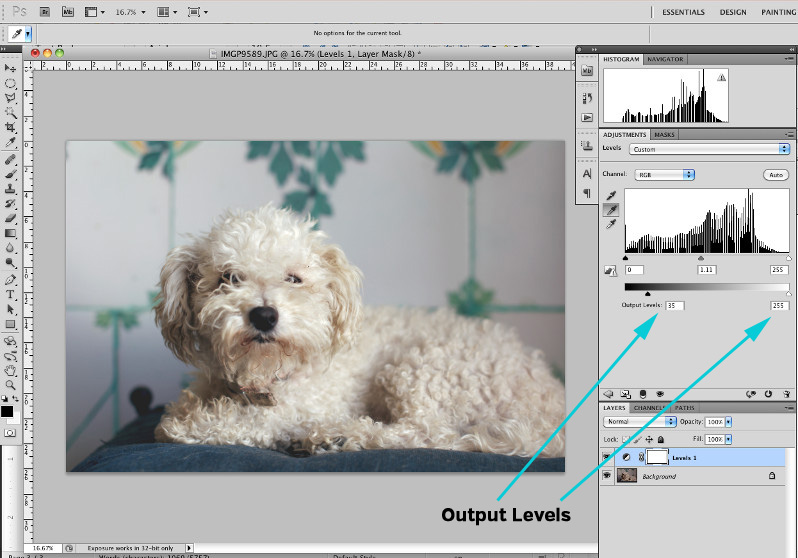
In most cases I would advise that you don’t adjust the Output Levels slider as you run the risk of making an image look washed out and lacking in contrast. If your monitor is not accurately calibrated, it can be very hard to judge the effect of your adjustments and things can look very odd when you print a photo.
However, in this case, I’ve used this technique to lighten the shadows on the photo that I used the eye droppers on. You can drag the black slider on the Output Levels to the right, which has the effect of making any pixels that are pure black a dark gray tone instead. You should be able to see the difference in the screen shot and depending on your monitor, it may look too washed out. If you ever try this on a photo, I’d recommend that you print the photo to check if the result is acceptable.
Conclusion
The Levels Adjustment Layer is quite an easy way to make quick improvements to your photos and, as you can see, there are several ways that you can use this tool. Just choose the method that you feel most comfortable with.

